15.4.1 Gas Valve
NOTE: If the left hand clearance is >50mm then the gas valve
can be replaced with the burner and combustion chamber cover
in place by unscrewing the four extended screws at the manifold
on the outside of the inner casing. The manifold gasket should be
replaced if it is damaged or has deteriorated.
Check that the gas supply is isolated.
Remove the inner casing cover, the combustion chamber cover
and the burner blade assembly. Refer to Section 14.3.
Unscrew and lower the base plate/control assembly.
Unplug the electrical connection at the gas valve.
Unscrew and remove the side plate adjacent to the manifold.
Undo the four screws securing the gas cock to the valve. Take
care not to damage the control panel.
Undo the four pozi-head screws to remove the gas valve and
burner manifold assembly.
Undo the four pozi-head screws inside the casing to separate the gas
valve from the manifold.
Use new O-rings when replacing the valve.
Set the Gas Valve:
Connect a pressure gauge to the burner pressure test point on
the valve. Refer to Fig. 31.
Switch on the gas and electricity supplies. Check for gas
soundness at the gas valve inlet.
Refer to Section 12 Commissioning for the method of checking
the pressures.
Check for gas soundness at the gas valve outlet.
Adjust the gas valve to obtain the required pressure. Refer to the
data plate on the cabinet where required pressure will be indicated.
Alter the red arrow if a new setting is made.
The adjustment screw must be sealed by a dab of paint to stop
unauthorized adjustment.
Switch off the appliance, disconnect the pressure gauge and
tighten the test point screw. Refer to Fig. 31.
Check for gas soundness.
15.4.2 Spark Electrode
Remove the inner casing cover and the combustion chamber
cover.
Carefully pull off the leads at the electrodes. Remove the burner
blade assembly. Refer to Section 14.3.
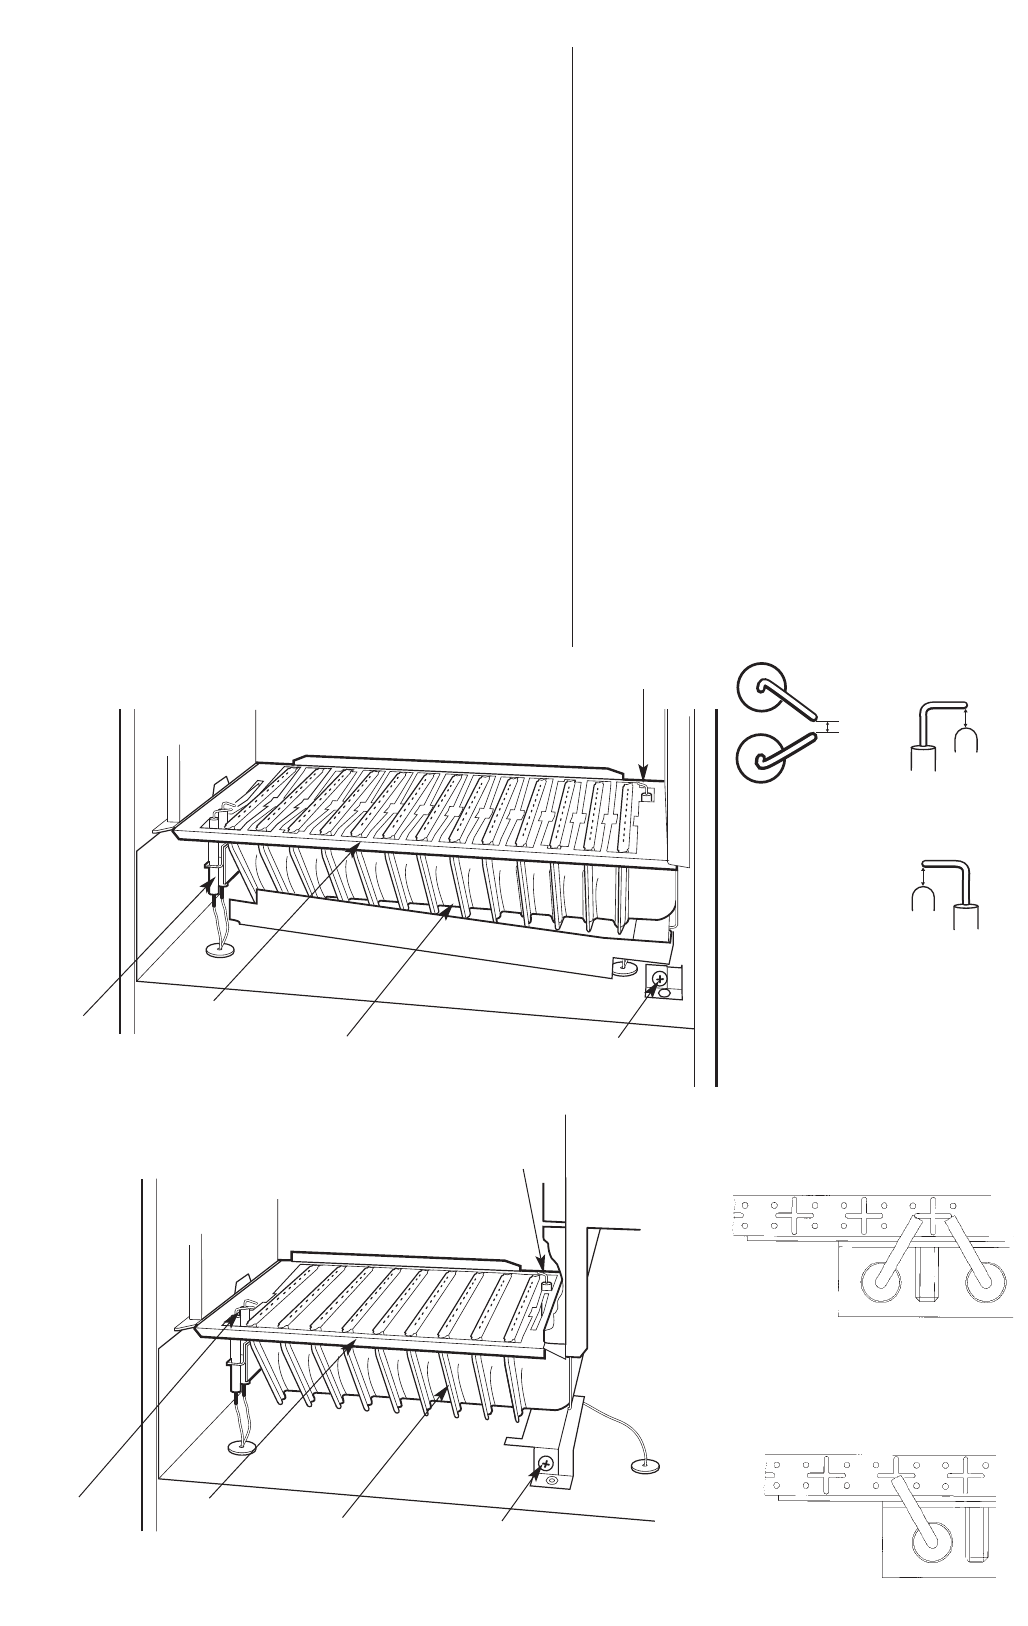
Unscrew and remove the electrode assembly. Refer to Fig. 36 and 36a.
15.4.3 Flame Sense Electrode
Remove the inner casing cover and the combustion chamber
cover.
Pull off the connections to the spark electrode. Carefully remove
the burner blade assembly. Refer to Section 14.3.
Carefully pull off the lead from the electrode.
Unscrew and remove the electrode assembly. Refer to Fig. 36 and 36a.
Ensure that the new electrode is at the correct height and
position on the burner blade.
15.4.4 Burner Blade Assembly
Remove the inner casing cover and the combustion chamber cover.
Remove the burner blade assembly. Refer to Section 14.3.
28
Fig. 36. Burner Blade Assembly 14/19 and
19/24CBi
1
1. Burner blade assembly
2. Burner fixing screw
3. Flame sense electrode
4. Spark electrode
5. Burner baffle (not removable from
the burner
2
3
4
5
Fig. 36a . Burner Blade Assembly 9/14CBi
1
2
3
4
5
Spark Electrode Gaps
2.5
4.1±0.2
Flame Sense Electrode Gap
3.1±0.2
Spark Electrode Position
Both Burners
Flame Sense Electrode Position
Both Burners


