


USING THE HUMIDISTAT
The Humidistat feature allows you to set and
maintain the humidity level you wish for your room
to maintain. The Humidistat setting is designed to
operate between 25% and 65% relative humidity
range. The recommended setting is 40-50%.
Turn the Humidistat clockwise as far as it will turn
to achieve the highest setting. In this setting, the
humidifier will run constantly, and produce the
greatest amount of moisture.
To lower your desired humidity level, simply turn
the Humidistat counterclockwise to choose your
setting.
When the humidity in the room is less than the
level you have set, the humidifier will continue to
produce moisture. Once the set humidity level
has been achieved, the fan will turn off. When
the room humidity drops below your set level,
the unit will automatically begin producing
moisture again.
Depending on the size of your room and your
personal comfort, you will set your humidistat at
different levels. If condensation forms on your
windows or walls, or your measured room humidity
reads above 50% by use of a hygrometer, turn
off your humidifier, or lower your Humidistat level.
REPLACING THE FILTER
Through normal use, waterborne minerals and
sediment become trapped in the wick filter. The
harder your water, the greater the amount of
minerals in the water, and the more often you
will need to change your filter.
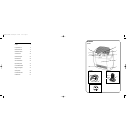
You will be able to monitor the life of the filter in
your humidifier by checking the Filter Monitor
Indicator. When the unit is off, the Filter Monitor
Indicator will read in the O position. After 60 minutes
of use, Filter Monitor Indicator (refer to fig. 4 for
close-up of indicator) will move from the O position
and indicate your filter condition.
A brand new filter will register in the blue section
reading OK filter. After frequent use of your
humidifier, the Filter Monitor Indicator will let
you know when the filter needs to be changed.
When the needle is in the red ( ) section, this
means the proper amount of moisture is not
getting into your air due to the excessive minerals
and sediment that have become trapped on your
filter. At this point, you should replace your filter.
It is important to change your filter as indicated
to obtain stated performance level.
To replace the filter, follow the steps
below.
1. Be sure the Control Knob is in the OFF position
and the unit is disconnected from the electrical
outlet.
2. Remove the tank and main housing to access
the base tray.
3. Discard the old filter and follow weekly cleaning
instructions.
4. Insert a new filter into the filter support in the
base.
5. Replace the main housing and then the tank.
6. Repeat Operating Instruction steps.
It will take about 30 minutes for the humidifier to
reach maximum output.
You can obtain a new filter by calling 0870 759 9000
(in UK). This humidifier takes model BWF75-I
replacement filter.
CLEANING AND MAINTENANCE
INSTRUCTIONS
Humidifiers provide comfort by adding moisture
to dry, heated indoor air.
To benefit most from the humidifier and avoid
product mis-use, follow all instructions carefully.
Please note that this is an electrical appliance
and requires attention when in use.
In addition, if you do not follow the recommended
care and maintenance guidelines, micro-organisms
may be able to grow in the water within the Water
Tank. You must routinely follow the cleaning
procedures that follow in order to ensure proper,
efficient operation of your humidifier. Proper
maintenance and cleaning is essential to the
continued performance of your unit and the
avoidance of algae or bacteria build-up.
DAILY MAINTENANCE
1. Before cleaning, turn the Control Knob off and
unplug the unit from the electrical outlet.
2. Remove the housing and the tanks from the
humidifier and place them in sink or tub.
3. Carry the base of the unit to the sink, remove
the wick filter, place in sink, drain any remaining
water and rinse thoroughly to remove any
sediment or dirt. Wipe clean, and dry with a
clean cloth or paper towel.
4. Drain the water from the tanks into the sink
and rinse each tank thoroughly. Wipe clean,
and dry with a clean cloth or paper towel.
5. Put filter back in the filter supports, replace
the housing, then refill the tanks with cool tap
water as instructed earlier in the Filling
Instructions. Do not overfill.
6. Follow Operating Instructions.
WEEKLY MAINTENANCE
To Remove Scale:
1. Repeat steps 1-4 above.
2. Partially fill the base with Bionaire™ Cleaning
Solution as instructed on bottle, or with two 8
oz. cups of undiluted white vinegar. Leave this
solution in the base for 20 minutes, while
cleaning all interior surfaces with a soft brush.
Remove base scale by wiping the base with a
cloth dampened with undiluted white vinegar.
3. Rinse with clean warm water to remove the
cleaning solution before disinfecting the tank.
To Disinfect Humidifier Base Tanks
1. Fill Humidifier Base with 2 gallons of water and
1/2 teaspoon of chlorine bleach.
2. Fill each tank 1/2 full with water and 1 teaspoon
of chlorine bleach.
3. Let the solution stand for 20 minutes, swishing
every few minutes. Wet all surfaces.
4. Carefully empty the Base and Tanks after 20
minutes, and rinse with water until you cannot
detect any bleach smell. Dry with a clean cloth
or paper towel.
5. Check the Filter Monitor Indicator to see if it is
time to replace the filter. Depending on the
water hardness in your area, it may be necessary
to change the filter every 1-2 months. Re-insert
the wick filter into the filter support.
6. Refill the water tanks as directed with cool tap
water, replace the humidifier housing, and turn
the Control Knob to ON.
If not available follow these instructions
1. Repeat steps 1-3 in the Maintenance section.
2. Clean the tray by partially filling the tray with
200ml of undiluted white vinegar. If the element
is heavily scaled, plug the humidifier into an
electrical socket and turn it ON for no longer
than 15 seconds. After this time turn the humidifier
OFF and unplug it from the electrical outlet.
Let solution stand 20 minutes, cleaning all interior
surfaces with a soft brush. Dampen a cloth with
undiluted white vinegar and wipe out entire tray
to remove scale.
3. Rinse with clean warm water to remove scale
and the white vinegar solution before beginning
to disinfect the tank.
4. Wipe the heating element clean with a soft cloth
after it has had a chance to cool.
Disinfect tank
1. Fill tank with 1 teaspoon of bleach and 3.5 litres
of water.
2. Let the solution stand for 20 minutes, swishing
every few minutes. Wet all surfaces.
3. Empty the tank after 20 minutes, and rinse well
with water until the bleach smell is gone.
Dry with some paper towel.
4. Refill the water tank with cool water; replace
the water tank. Repeat Operating Instructions.
STORAGE INSTRUCTIONS
When not using your humidifier for an extended
period of time:
1. Dispose of the filter. DO NOT leave in unit.
2. Clean, rinse and thoroughly dry the humidifier
as directed in weekly maintenance. DO NOT
leave any water in the unit when storing.
Leaving water in the unit may render the unit
in-operable for the following season.
3. Place the humidifier in the original carton and
store in a cool, dry place.
4. Order your Bionaire™ replacement filter
(BWF-75-I) for next year’s use.
SERVICE INSTRUCTIONS
1. Do NOT attempt to repair or adjust any electrical
or mechanical functions on this unit. Doing so
will void the warranty. The insides of the unit
contain no user serviceable parts. Only qualified
personnel should perform all servicing.
2. Should the unit stop working, first check the fuse
in the plug (UK only) or fuse/circuit breaker at
the distribution board is operating, before
contacting the manufacturer or service agent.
3. If you need to exchange the unit, please return
it in its original carton, with a sales receipt,
to the store where you purchased it.
4. Should your humidifier require service, please
contact your local dealer.
ACCESSORIES FOR MODEL BCM3600
• BWF75-I Wick filter.
• Bionaire™ Cleaning Solution
For U.K. and Ireland only:
If the plug is not suitable for the socket outlets in
your home, it can be removed and replaced by
a plug of the correct type. Please refer to
"Installation of a plug" below.
Installation of a plug
Applicable to U.K. and Ireland
The wires in the mains lead are coloured as such:
BROWN - LIVE
BLUE - NEUTRAL
Please note that the colour of these mains wires
may not correspond with the colour markings that
identify the terminals in your plug. Please proceed
as follows:
The BROWN coloured wire must be connected
to the terminal, which is marked with the letter
"L" or is coloured RED.
The BLUE coloured wire must be connected to
the terminal, which is marked with the letter "N"
or is coloured BLACK.
DO NOT CONNECT either of these wires to the
earth terminal in the plug. The earth terminal plug
is marked with the letter "E", or with the earth
symbol or coloured GREEN, or GREEN and
YELLOW.
54
BCM3600I/IUK04M1 Visual.qxd 6/18/04 16:10 Page 9