


PLEASE SAVE THESE INSTRUCTIONS
Please note that this is an electrical
appliance, and requires attention when
in use.
HOW YOUR COOL MIST HUMIDIFIER
WORKS
Your Bionaire™ Cool Mist humidifier draws dry
air through the rear air intake grill area. This air
is then passed through a moisture–laden wick
filter, which retains the minerals and deposits in
the water. The resulting moist air is directed back
into the room from the top air grill.
NOTE: This humidification system provides a
cool, invisible moisture output. It is normal not to
see the mist.
NOTE: A humidity level below 20% can be
unhealthy and uncomfortable.
The recommended humidity level is between
40%-50%.
PRE-OPERATING INSTRUCTIONS
1. Be sure the Control Knob is in the OFF position
and the unit is disconnected from the electrical
outlet.
2. Remove housing, filter and tanks.
3. TO PROVIDE ADDITIONAL MOBILITY AND
CONVENIENCE TO YOUR CONSOLE
HUMIDIFIER, install the wheels. Remove the
four wheels located in a small pouch in the box.
Turn the base upside down, and locate the holes
at each of the four corners on the underside.
NOTE: You will notice that there are two
different shaped wheels. Two of the 4 wheels
are stationary wheels and two are swivel type
wheels.
The stationary wheels are identified by a flat
top surface, while the swivel type are curved
and include a small plastic piece on the shaft.
See figure 2 for installation location for each
type of wheel. DO NOT use any tools to install
the wheel because tools may damage the base
of the unit. Return the base to the upright position.
4. Replace filter, housing and tanks.
5. Choose a location out of reach of children.
DO NOT place the humidifier on a finished
floor or near furniture which can be damaged
by moisture or water.
Filling the Water Tank
NOTE: This humidifier holds about 13 litres of
water in the tank and humidifier base. The humidifier
will produce up to 34 litres of moisture over a
24-hour period.
1. Remove the two tanks from the base of the
humidifier and bring each tank to the faucet.
Turn the tanks upside down and twist off the
tank caps by turning counter-clockwise.
Fill each tank with cool, fresh tap water.
Replace the cap on each tank FIRMLY.
2. When full, carry each tank to the humidifier and
place onto the base (use both hands when
carrying each tank). Each tank holds 6 litres
of water, and the base holds 0.9 litre of water.
3. Plug the power cord into the electrical outlet.
OPERATING INSTRUCTIONS
With housing placed properly onto the base, the
filter installed correctly, the tanks filled and the
plug correctly inserted in the outlet, you are now
ready to operate the humidifier.
NOTE: The BCM3600 produces clean, cool,
INVISIBLE moisture.It is normal not to see the
moisture.
1. Turn the Control Knob to the HI position and
turn the Humidistat to HI.
2. Allow up to 30 minutes for the filter to fully
absorb water and the unit to produce the
maximum moisture output.
3. Adjust the 3-speed Humidity Control Knob and
the Humidistat as desired.
4. The Automatic Humidistat Control is designed
to operate between 25% and 60% Relative
Humidity range. The recommended setting is
between 40% and 50%. When the humidity
level in the room is below the level you have
set, the humidifier will operate to produce
moisture. When the set humidity level in the
room is reached, the humidifier will stop.
When the humidity again drops below the set
level, the unit will automatically start and produce
moisture again.
NOTE: We recommend the use of the
hygrometer which reads the actual humidity
level in your room. A humidity level below
20% can be unhealthy and uncomfortable. The
recommended humidity level is between 40%
and 50%.
5. When the water level is low, the refill light will
illuminate to indicate the unit needs refilling.
Shut off and unplug the unit.
NOTE: THE FAN WILL CONTINUE TO RUN
TO ALLOW THE HUMIDIFIER TO DRY OUT
AND PREVENT ALGAE GROWTH.
6. Before refilling, follow Daily Maintenance
Instructions and check to see if the filter needs
replacing by comparing it to the Color-Coded
Filter Monitor (located on the side of the
humidifier housing) with the filter wear.
7. Refill water tanks.
8. Plug into the electrical outlet. Turn the Humidity
Control Knob to the HI ( III ), MED ( II ), or
LOW ( I ) setting.
NOTE: If moisture forms on the walls or
windows, turn off the humidifier.
3
2
CONGRATULATIONS
By choosing a Bionaire™ humidifier, you have chosen
one of the finest humidifiers on the market today.
PLEASE READ AND SAVE THESE
IMPORTANT INSTRUCTIONS.
NOTE: Before reading these instructions,
please refer to the corresponding illustrations
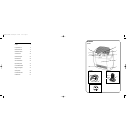
DESCRIPTIONS (SEE FIG 1)
A.Water Tanks
B.Humidistat
C.Refill Light
D.Moisture Exhaust Grills
E.Power Light
F. Filter Monitor™ Indicator
G.Air Intake Grills
H.Humidifier Base
I. Humidifier Housing
J. Control Knob
WHEEL INSTALLATION (FIG. 2)
A.Stationary Wheels
B.Swivel Wheels
C.Under-Side of Humidifier Base
FIG. 3
A.Circular Extended Life Filter
B.Circular Filter Support
C.Float Switch
D.Humidifier Base
SAFETY PRECAUTIONS
When using electrical appliances, basic safety
precautions should always be followed to reduce
the risk of fire, electric shock, and injury to persons,
including the following:
• Read all instructions before using the appliance.
•To avoid fire or shock hazard, plug the appliance
directly into an electrical outlet and fully insert
the plug.
• Keep the cord out of heavy traffic areas.
To avoid fire hazard, NEVER put the cord
under rugs, or near radiator, stoves, or heaters.
• DO NOT place humidifier near heat sources
such as stoves, radiators, and heaters.
Do locate your humidifier on an inside wall near
an electrical outlet. The humidifier should be
at least 10cm/4" away from the wall for best
results.
• WARNING: Do not attempt to refill humidifier
without first unplugging the unit from it's
electrical outlet. Be sure to pull by the plug
and not the cord.
• NEVER drop or insert any object into any
openings. DO NOT place hands, face, or body
directly over or near Moisture Outlet while unit
is in operation. DO NOT cover Moisture Outlet or
place anything over it while the unit is operating.
• DO NOT operate any appliance with a damaged
cord or plug, after the appliance malfunctions,
or if it has been dropped or damaged in any
manner. Return appliance to manufacturer for
examination, electrical or mechanical
adjustment, or repair.
• Use appliance only for intended household
use as described in this manual. Any other
use not recommended by the manufacturer
may cause fire, electric shock, or injury to
persons. The use of attachments not
recommended or sold by The Holmes Group,
may cause hazards.
• DO NOT use outdoors.
• Always place humidifier on a firm, flat, level
surface. A waterproof mat or pad is
recommended for under the humidifier.
NEVER place it on a surface that may
become damaged by exposure to water and
moisture (i.e. finished floor).
• DO NOT allow the Moisture Outlet to directly
face the wall. Moisture could cause damage,
particularly to wallpaper.
• Humidifier should be unplugged when not in use.
• NEVER tilt, move, or attempt to empty unit
while it is operating. Shut off and unplug before
removing the water tank and moving the unit.
DO NOT attempt to remove the water tank
within 15 minutes after the humidifier is turned
off and unplugged. Serious injury may result.
• This humidifier requires regular maintenance
to operate appropriately. Refer to cleaning
and maintenance procedures.
• NEVER use detergents, petrol, glass cleaner,
furniture polish, paint thinner, or other household
solvents to clean any part of the humidifier.
• Excessive humidity in a room can cause water
condensation on windows and some furniture.
If this happens, turn the humidifier OFF.
• Do not use humidifier in an area where
humidity level is in excess of 55%.
• DO NOT attempt to repair or adjust any
electrical or mechanical functions on this unit.
The inside of the unit contains no user
serviceable parts. All servicing should be
performed by qualified personnel only.
• If the supply cord is damaged, it must be
replaced by the manufacturer or its service
agent or a similarly qualified person.
U.K. and IRELAND
BCM3600I/IUK04M1 Visual.qxd 6/18/04 16:10 Page 7