14
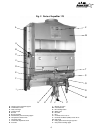
Letter references, e.g. "L" in this section refer
to Fig. 2 on page 6.
Introduction: The flow of gas to the AquaStar
burners is triggered by a water flow valve.
Numerous water related problems can cause
this water flow valve to malfunction such as:
1. Insufficient water flow volume to activate the
burners at their minimum flow requirement
2. Dirt in the water flow valve causing the valve
to malfunction
3. Sediment buildup in faucet aerators or shower
heads preventing minimum flow requirement
4. Uneven pressures between cold and hot (with
single lever faucets)
5. Plumbing cross-overs
These water related problems can cause the
heater to deliver less than its full output, or to
shut down completely.
SPECIFIC PROBLEMS AND ANSWERS
Note: Problems are stated in upper case, bold
face. Most common causes for the problems
follow in order of likelihood of occurence. For
most of the suggested solutions, it will be nec-
essary to take the front cover of the heater off.
To do this, pull the knobs off and remove the 3
screws at front of panel, then lift and pull the
front panel off. It is also advisable to remove
the bottom tray: Pull off the plastic handle of
the manual gas valve and remove the 4 bottom
screws. The tray will drop down.
Mineral Scale Buildup:AquaStars, when operated at high temperatures or in hard water areas,
may need periodic descaling. To check the inside of the heat exchanger for scaling, remove the
thermostat sensing element from inside the heat exchanger (B), page 6. If you note mineral
buildup in the heat exchanger, flush it with a descaling solution. Consult your dealer or call CEC
for instructions.
TROUBLE SHOOTING
PILOT WILL NOT LIGHT
1. No gas to the AquaStar
A. Gas cock on gas line may not be open.
B. AquaStar manual shut off valve at base of
heater is not open. Turn handle to red flame sym-
bol.
2. In-line AquaStar gas regulator jammed
(usually with LP gas)
Replace or unjam the regulator. Note: The regu-
lator furnished with the heater is designed for
low gas pressure. Excessive pressure will lock
it up. This problem usually happens if the gas
pressure between the gas tank and the water
heater has not been reduced. See page 3 of
your manual for specified gas pressures.
To unjam a regulator, remove the nickel size
screw plug on the front. Inside you will see
another large screw. Draw a line down the
threads to mark the location of the screw. Re-
move the screw and push on the bottom of the
hole with the eraser side of a pencil or similar
object. This will release the diaphragm. Rein-
sert the screw and screw it down to the end of
the mark you made.
3. Pilot orifice cloggged and/or air screen
dirty, or pilot filter is dirty.
Clean the pilot orifice and/or pilot filter screen.
Disconnect the pilot tube (T) by unscrewing it.
Be careful not to misplace the small washers.
The diagram on page 19 shows how the parts
of the pilot assembly fit together.
Natural gas orifices are large enough that you
can usually clean them by blowing through
them. The LP orifice is so small that it is best
to replace it. Never try to enlarge the hole, or
use a sharp hard object for cleaning. Doing
so will ruin the orifice.
The pilot gas filter is made from a layered ma-
terial. If it becomes too dirty, a portion of the
filter can be separated and peeled off. The clean
portion should be loosely reinserted into the pilot
burner brass filter chamber. Be careful when
re-installing the pilot burner to aim the burner
so that the smaller right hand pilot flame touches
the thermocouple tip.


