


5
5. Please refer to the power supply installation section, to route the power cables
to your devices. Once you’ve done so, connect the appropriate power connec-
tors to your device.
Installing the power supply
1. With the case upright and both side panels removed (see Setting Up), remove
the screws on both sides of the power supply retaining cage and pull the cage out.
2. Slide your power supply into the cage, and slide the cage with power supply
back into the case. Note: You can mount the power supply either side up, but
don’t fasten the power supply and cage to the case at this time.
3. There is a plastic sliding panel assembly between the upper and lower cham-
bers that lets you run power and data cables between the chambers while
maintaining thermal isolation. It has two parts, one large and one small, both
of which can slide independently to adjust the size of the openings. Loosen the
two thumbscrews holding the panels and slide the large panel all the way to
the rear of the case to fully expand the opening.
4. Carefully guide all the power cables through the opening to the upper chamber.
Route power cables to your installed upper chamber devices and make the
appropriate connections. Note: you may want to pull the power cable of the
lower chamber 120mm fan to the upper chamber for easy cable management.
5. Now secure the power supply by screwing the retaining cage to the case.
Also fasten the power supply to the back of the case at this time with the
screws provided.
6. Slide the small plastic divider panel to the rear of the case to fully expand the
other opening.
7. Carefully route power and data cables to the lower chamber as necessary for
the hard drives you have installed in the lower chamber. Make the appropriate
connections.
8. Slide both the large and small plastic panels all the way to the front of the case
to close the openings.
9. Tighten the two thumbscrews to secure the sliding panels.
Cooling System
The Tricool™ fan:
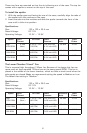
The P180B includes three installed 120mm Tricool™ fans. Tricool™ fans have a
three-speed switch that lets you choose between quiet, standard or maximum
cooling. We set the default fan speed to “Low” for the upper and rear120mm
fans. (See specifications below.) Note: The minimum voltage to start the fan is
5V. We recommend our users to set the fan speed to High if you choose to con-
nect the fan to a fan control device or to the Fan-Only connector found on some
Antec power supplies. A fan-controlled-device regulates the fan speed by varying
the voltage to the fan. The voltage may start as low as 4.5V to 5V. Connecting
a Tricool™ set on Medium or Low to a fan-control device may result in the fan not
being able to start. The already lowered voltage from the fan control device will be
further reduced by the Tricool™ circuitry below 5V.
The Top and Rear Exhaust Tricool™ Fans
We recommend leaving these two fans at the default Low speed setting as these
fans sit right next to your CPU and can effectively exhaust heat from your chas-
sis. If you choose to overclock or install a very hot CPU you can increase the fan
speed to achieve better cooling.