


16
The art of purifi cation
®
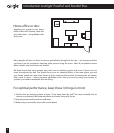
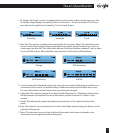
When your unit is set on High, the sensor (on the side of the unit) is more sensitive to the
environment. The system will auto-activate when it detects small amounts of particles in the air.
And since it is more responsive to these small amounts of particles, it will activate frequently and
this will shorten the life of the fi lter however air will be more pure in your room.
When you unit is set on Low, The sensor (on the side of the unit) is less sensitive to the environment.
The system does not auto-activate until it senses a medium to high amount of particles in the air.
This setting eXTends the fi lter life.
If you own
an AG850, that unit includes the Titanium Pro
®
module.
If your unit has been installed with the Titanium Pro
®
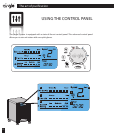
module, the light bulb icon will display on
your control panel. The light bulb serves to indicate if your unit has the module installed, but also
indicates when it is time to replace the module by blinking.
The Titanium Pro
®
module is designed to last 6000 hours. When that time is up, the light bulb icon
will start blinking. After you replace the fi lter, and you press the Reset button (right hand side of
the panel), it will stop blinking.
If desired, the Titanium Pro
®
module can be turned off .
1. With the power turned off , press the Timer button and hold down for more than 5 seconds.
2. The light bulb indicator will start blinking
3. When the light bulb is on, press the Timer button again to turn on the Titanium Pro
®
module
4. When the light bulb is off , press the Timer button to turn off the Titanium Pro
®
module
What happens in High Mode?
What happens in Low Mode?
Titanium Pro
®
17
The art of purifi cation
®
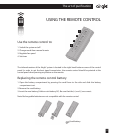
USING THE REMOTE CONTROL
Use the remote control to:
3WITCHTHESYSTEMONOFF
2. Change mode from manual to auto
3. Regulate fan speed
4. Set timer
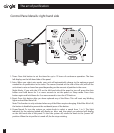
The infrared receiver of the Airgle
®
system is located in the right hand bottom corner of the control
panel. In order to get the best signal transmission, the remote control should be pointed at the
control panel when pressing any button on the remote.
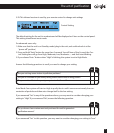
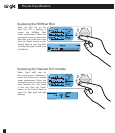
1. Open the battery compartment by pressing the small lever to the side and slide the battery
compartment out.
2. Remove the used battery.
3. Insert the new battery (Lithium coin battery 3V). Be sure that the (+) and (-) are correct.
Note: Rechargeable batteries are not compatible with the remote control.
Replacing the remote control battery
1
2
3
4
Used battery