


SELF-PRIMING CENTRIFUGAL PUMPSOM--04760
OPERATIONPAGE C -- 4
After stopping the pump, lock out or disconnect
the power source to ensure that the pump w ill re-
main inoperative.
Cold Weather Preservation
In below freezing conditions, drain the pump to
prevent damage from freezing. Also, clean out any
solids by flushing with a hose. Operate the pump
for approximately one minute; this will remove any
remaining liquid that could freeze the pump rotat-
ing parts. If the pump will be idle for more than a
few hours, or if it has been pumping liquids con-
taining a large amount of solids, drain the pump,
and flush it thoroughly with clean water. To prevent
large solids from clogging the drain port and pre-
venting the pump from completely draining, insert
a rod or stiff wire in the drain port, and agitate the
liquid d uring the draining process. Clean o ut any
remaining solids by flushing with a hose.
BEARING TEMPERATURE CHECK
Bearings normally run at higher than ambient tem-
peratures because of heat generated by friction.
Temperatures up to 160_F(71_ C) are considered
normal for bearings, and they canoperate safelyto
at least 180_F(82_ C).
Checking bearing temperatures by hand is inaccu -
rate. Bearing temperatures can be measured ac-
curately by placing a contact-type thermometer
against the housing. Record this temperature for
future reference.
A s udden increase in bearing temperature is a
warning that the bearings are at the point of failing
to operate properly. Make certain that the bearing
lubricant is of the proper viscosity and at the cor-
rect level (see LUBRICATION in the Maintenance
And Repair manual). Bearing overheating can
also be caused by shaft misalignment and/or ex-
cessive vibration.
When pumps are first started, the bearings may
seem to run at temperatures above normal. Con-
tinued operation should bring the temperatures
down to normal levels.
LUBRICATION
Do not remove plates, covers, gauges,
pipe plugs or fittings from an over -
heated pump. Vapor pressure within the
pump can cause parts being disen-
gaged to be ejected with great force. Al-
low the pump to completely cool be fore
servicing.
On a new pump, check the oil level in the seal and
bearing cavities before initial startup, after the first
two weeks of operation, and every month thereaf-
ter.
Before installing or removing the lubrication plug,
always clean the area around the plug to prevent
contamination.
Self Lubricated Seal Assembly
The self lubricated seal assembly is lubricated by
the medium being pumped,or bya flow of fresh liq-
uid from an external source. Flushing liquid may
be taken from the pump discharge and supplied
through auxiliary piping.
When handling abrasive or tacky liquids, supply
fresh lubricating liquid from an external source. Be
sure the liquid supplied to the seal is compatible
with the liquid being pumped, and that its flow is
controlled to prevent dilution. Consult the factory if
flushing is required.
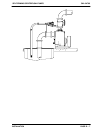
OilLubricatedSealAssembly
Before starting the pump, remove the vented plug
and fill the seal cavity with SAE No. 30 non-deter-
gent oil. Clean and reinstall t he vented plug. Refer
to the Maintenance And Repair Manual for the
seal cavity oil capacity.
Grease Lubricated Seal Assembly
Fill the automatic grease cup through the grease
fitting with No. 2 lithium base grease until grease
escapes from the relief hole. Turn the grease cup
arm counterclockwise until it is at the top of the