12-EN
Inserting/Ejecting a Disc
1
Press OPEN on the unit.
The display changes to the EJECT/TILT screen.
2
Insert a disc:
Touch [OPEN] on the EJECT/TILT screen.
The movable monitor will open, then insert a disc into the
disc slot. Inserting a disc will close the monitor
automatically.
Eject the disc:
Touch [EJECT] of DISC on the EJECT/TILT screen.
The movable monitor will open. Then the disc is ejected.
3
Touch [CLOSE] on the EJECT/TILT screen.
The movable monitor will close.
• Touching [ ] returns to the earlier main source screen.
• Do not apply shock to the movable monitor when it is open as it may
result in malfunction of the unit.
• The monitor may be dim during low temperature and immediately
after turning on the power. The brightness will return to normal as
time elapses.
• The monitor will stop at the set tilt angle when closing.
Adjusting the Monitor Viewing Angle
Adjust the monitor’s angle for better visibility.
1
Press OPEN on the unit.
The display changes to the EJECT/TILT screen.
2
Touch [ ] or [ ] of TILT to adjust the desired
monitor angle.
The monitor angle can be adjusted in 5 stages.
3
Touch [ ] to return to the previous screen.
• If the monitor touches an obstacle while the angle is being adjusted,
it will stop immediately.
• The screen color will vary when viewed at certain angles. Adjust the
screen angle for the best viewing position.
• If the voltage of the vehicle’s battery power is low, the screen may
blink when the screen angle is changed. This is normal and not a
malfunction.
• Touching and holding [ ] for at least 2 seconds will change to the
main source screen.
Adjusting the Volume
Adjust the volume by pressing or .
Volume decreases/increases continuously by pressing and
holding or .
Volume: 0 - 35
Lowering Volume Quickly
Activating the Audio Mute function will instantly lower the volume
level by 20 dB.
Press
MUTE
to activate the MUTE mode.
The audio level will decrease by about 20 dB.
Pressing
MUTE
again will bring the audio back to its
previous level.
How to view the Display
• Be sure to touch the button lightly with the pad of your finger on the
display to protect the display.
• If you touch a button and there is no reaction, remove your finger
from the display, and try again.
Here is an example explanation for the Radio mode display on how to
recall a source.
1
Touch [SOURCE] on the main screen.
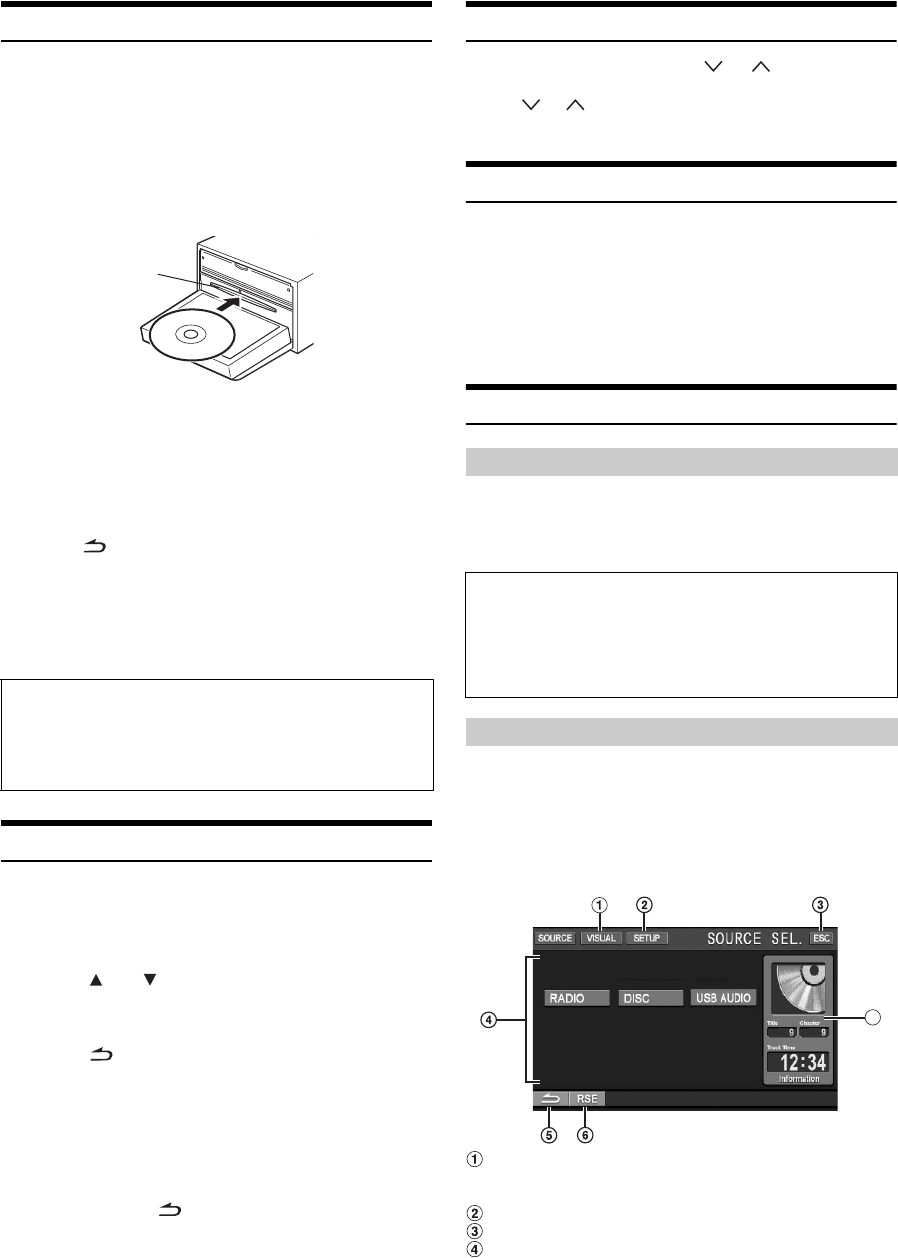
The SOURCE selection screen is displayed.
Display example for SOURCE selection screen
Changes to VISUAL selection screen.
Set to VISUAL in “Setting the VISUAL Soft Button”
(on page 39).
Changes to SETUP selection screen.
Changes to main source screen.
Displays source modes that can be selected
(The kind of source modes that are displayed varies
depending on connection and setting).
CAUTION
Keep hands (or any other object) away from the monitor while it
is opening or closing to avoid damage or injury. The back of the
movable monitor will get very warm under normal operating
conditions. This is not a malfunction. Do not touch.
Disc Slot
Soft button operation
About the button descriptions used in this Owner’s Manual
• Soft buttons, ones found in the display, are shown in bold
enclosed in brackets, [ ] (e.g. [SOURCE]).
• Whenever a soft button and a head unit button have the same
function, the explanations in this Owner’s Manual will describe
the function of the soft button.
Recalling the Source
A
