


14
External IR Receiver Connections
Use an external Xantech IR Receiver in cases where a hand-held remote
needs to be pointed somewhere other than at the MRKP2 or in cases where
additional interference requires the use of a different type of IR receiver or IR
receiver mounting location. Typical IR Receiver locations are near a TV or other
equipment such as a Local Source (DVD Player, A/V Receiver,…etc.). A CAT-
5 cable can be used to extend the IR receiver’s wire, if necessary. Refer to the
bottom of the Specifications section (page 19) for wiring instruction when using
CAT-5 cable to extend the IR signal.
By default, the MRKP2 External and Internal IR receivers are both active.
Having both active, in some cases, can cause issues with IR signal reflection
and/or multiple processing of the same IR command. In such specific cases it
is advisable to disable the Internal IR when using an external IR receiver. The
internal IR receiver can be disabled by removing jumper clip JP3 as shown
below.
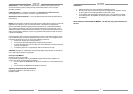
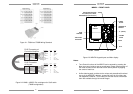
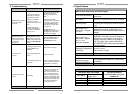
Figure 3.1: MRKP2 to External IR Connections
XANTECH CORP.
MRKP2-050710000077
XANTECH
IRRECEIVER
IN-ZONEIR
EMITTER
T
OMRC88m
C
ONTROLLER
+12VDC
IRIN
IROUT
GND
GND
IRSENSOR
ENABLEJUMPER
(JP3)
T
OEXPANSION
K
EYPAD
15
4. MRKP2 Setup
Initial Power-up
Whenever the MX88 or the keypad itself is reset, the MRKP2 will take
approximately 1 minute to initialize. During most of this period of time, with the
exception of first 5 seconds, the On/Standby LED will be illuminated in green as
an indication that boot-up is in progress.
QuickConfig
The Xantech QuickConfig feature facilitates the setup of the MX88 system from
a keypad without the use of a PC. Please refer to the QuickConfig Guide at
www.xamtech.com/MX88 for details on setting up QuickConfig.
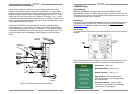
Set-up menu
To access the Main Setup Menu, press and hold down the “X” key for at least 5
seconds.
Once the Main Setup Menu is displayed on the touch screen simply touch and
release the listed item to access more information or to make adjustments.
Information - See Fig. 4.1
Backlight Settings – See Fig. 4.2
Installer Settings – See Fig. 4.3
Save and Exit - Leave the Main Setup
Menu and go back to normal display mode
and save changes
Exit without Saving - Leave the Main
Setup Menu and go back to normal display
mode without saving changes
Reset
button