


MAINTENANCE
86037580 GLIDE 01/03/07
4-7
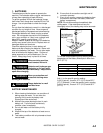
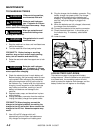
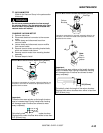
4. SIDE SQUEEGEE ADJUSTMENT
TO REPLACE OR ROTATE SIDE SQUEEGEE
BLADES (28 in. & 32 in.)
1. Loosen the locking knob and pivot the side
squeegee out as if to expose the brush.
2. Loosen and remove the three nuts and bolts
securing squeegee blades.
3. Remove the retaining strap and squeegee blade
and rotate or replace squeegee blade.
4. Install blade and retaining strap on locating pin
and reinstall three bolts and nuts.
5. Tighten nuts. Do not over tighten nuts as this
will damage the retaining strap and deform the
squeegee blade.
6. Pivot the side squeegee back into place and
tighten the locking knob.
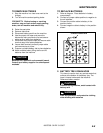
ADJUSTING THE SIDE SQUEEGEE
DEFLECTION
Side squeegee should deflect approximately 3/8
in. when in use. If the blade is under curled it will
skip low spots and leave puddles. It the blade is
over curled or worn it will smear water and leave
stripes and streaks.
1. Choose a smooth level surface. Lower the
scrub deck to the floor and drive forward slowly
while observing the curl and squeegee
performance.
2. To increase the curl, turn the deflection
adjustment knob counter clockwise.
3. To decrease the curl, turn the deflection
adjustment knob clockwise.
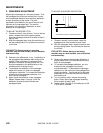
TO REPLACE OR ROTATE SIDE SQUEEGEE
BLADES (36 in.)
Left Side Squeegee
1. Loosen the locking knob and unscrew it until
it is near the top of the stud. Remove the
side squeegee assembly.
2. Loosen and remove the three nuts and bolts
securing the squeegee blade.
3. Remove the retaining strap and squeegee
blade and rotate or replace the blade.
4. Install blade and retaining strap on locating
pin and reinstall three nuts and bolts.
5. Tighten nuts. Do not over tighten nuts as
this will damage the retaining strap and
deform the squeegee blade.
6. Replace the side squeegee and tighten the
knob.
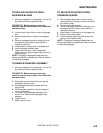
Right Side Squeegee and Secondary Side
Squeegee Blade
1. Loosen the locking knob and unscrew it until
it is near the top of the stud. Remove the
side squeegee assembly.
2. Loosen and remove the three nuts and bolts
securing the secondary squeegee blade.
3. Remove the retaining strap and squeegee
blade and rotate or replace the blade.
4. Reinstall the blade, retaining strap and
fasteners.
5. Do not over tighten nuts as this will damage
the retaining strap and deform the squeegee
blade.
6. To access the right side squeegee blade,
the secondary blade bracket must be
removed. Remove two bolts holding the
secondary blade bracket and set the bracket
aside.
7. Loosen and remove the three nuts and bolts
securing the side squeegee blade.
8. Remove the retaining strap and squeegee
blade and rotate or replace the blade.
9. Install blade and retaining strap on locating
pin and reinstall three nuts and bolts.
10. Tighten nuts. Do not over tighten nuts as
this will damage the retaining strap and
deform the squeegee blade.
11. Replace the secondary squeegee blade
bracket.
12. Replace the side squeegee and tighten the
knob.
ADJUSTING (36 in.)
The adjusting procedure is the same for all side
squeegees.
The right side squeegee is provided with two
adjusting knobs to allow greater control of the
curl from front to rear.