


4
3
This appliance is for HOUSEHOLD USE ONLY and may be plugged into any electrical
outlet (ordinary household current) of the appropriate configuration.
LINE CORD SAFETY TIPS
1. Never pull or yank on cord or the appliance.
2. To insert plug, grasp it firmly and guide it into outlet.
3. To disconnect appliance, grasp plug and remove it from outlet.
4. Before each use, inspect the line cord for cuts and/or abrasion marks. If any are
found, this indicates that the appliance should be serviced and the line cord
replaced. Please return it to our Service Department or to an authorized service
representative.
5. Never wrap the cord tightly around the appliance, as this could place undue stress
on the cord where it enters the appliance and cause it to fray and break.
DO NOT OPERATE APPLIANCE IF THE LINE CORD SHOWS ANY DAMAGE, OR IF
APPLIANCE WORKS INTERMITTENTLY OR STOPS WORKING ENTIRELY.
If the supply cord is damaged, it must be replaced by the manufacturer or its service
agent or similarly qualified person in order to avoid a hazard.
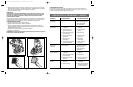
USING CARPET/FLOOR NOZZLE
The carpet/floor nozzle is constructed to allow constant contact with surfaces to be
vacuumed and for easy cleaning under furniture. Press the switch on the carpet/floor
nozzle for cleaning between smooth surfaces and carpeted floor.
HOW TO USE
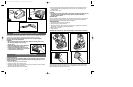
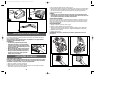
USING DUSTING BRUSH ATTACHMENT
1. Install dusting brush onto the
nozzle handle by sliding
it back until the locking tab
locks into position.
2. To vacuum with nozzle
handle, pull back the dusting
brush. Use the nozzle handle
for vacuuming baseboards, radiators and other hard to
reach areas.
3. To vacuum with the dusting brush, slide the brush down and
turn it to the appropriate position for vacuuming armchairs,
chairs and bookshelves.
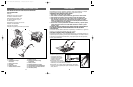
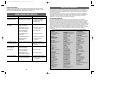
FILTRATION SYSTEM
The 5-stage filtration system includes:
a cloth dust bag (that serves as a filter),
1 double filter inside the compartment in the
cloth dust bag area, and 1 double filter
inside the back grille of the canister. The
filters protect the motor so that dust does
not get into it.
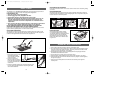
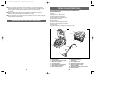
1. Connect the metal extension tubes, the floor nozzle and the hose.
2. To connect the hose to the canister, line up the hose and push in the latch tab. Insert
hose into canister until it snaps into place. To remove, press hose latch tabs inward
and pull up on hose. See figures 1 & 2 on page 5.
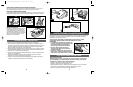
3. After assembling all parts, make sure dust bag and filters are properly installed.
See Maintenance Instructions section.
4. Pull out the power cord and plug it into the power outlet.
5. Press the power switch/pedal and start to vacuum. See figures 5 & 7 on page 5.
6. Adjust the desired suction level for different surfaces by using the suction regulator,
see figure 6 on page 5.
7. Press de power switch/pedal to turn off the vacuum cleaner; press it again to
resume power.
ASSEMBLY AND OPERATION
USING CREVICE TOOL ATTACHMENT
Insert the nozzle handle into the crevice tool. Use the crevice tool for vacuuming sliding
door tracks.
USING SHOULDER STRAP
The canister can also be carried around by using the shoulder strap and securing the
clips of the strap around the body. To avoid dropping the unit, it is important to carry the
vacuum cleaner in a horizontal position.
99/11-19-106E/S.LAT.GEN.VAC.UC 4/25/00 3:40 PM Page 4