


7
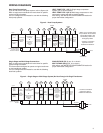
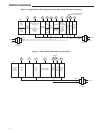
INSTALLER/CONFIGURATION MENU
1 & 2)Keypad Lockout – This menu selection will display
“Lk” and “OFF” (default, keypad not locked out). The
and are used to toggle the selection between
OFF and “L” (keypad locked out). When the keypad
lockout selection is enabled “L”, and the MENU button
is pressed again, the display will indicate the number
“0” (default, still disabled) in the time digits. The
and
are used to set the combination number from 0
to 999. If a combination of 0 is selected and the MENU
button is pressed, the menu will be exited and keypad
will not be locked. If 1 to 999 is selected and the MENU
button is pressed, the combination is stored into memory
and the menu is exited. The “Lk” will display designating
keypad locked with a valid combination. The SYSTEM
button will operate for 10 seconds after the menu mode
is exited to allow the user to change the mode from
“OFF” to the desired SYSTEM mode.
While the keypad is locked out, a press of MENU will en-
ter the configuration menu. The first menu item displayed
is the combination code “0”. The
or keys are
used to set the combination unlock number from 0 to
999. If the unlock number matches exactly with the com-
bination lock number stored in memory when the MENU
button is pressed, the keypad is unlocked and the “Loc”
is removed. If the unlock number does not match when
the MENU button is pressed, the combination returns to
“0” for another attempt to set the unlock code. To exit the
menu without unlocking the keypad, press RUN SCHED.
To reset the combination code and unlock the keypad if
the code is forgotten, see troubleshooting section.
3) This control can be configured for:
MS 2 – Multi-Stage System (no heat pump)
HP 1 – Heat Pump with one stage of compressor
HP 2 – Heat Pump with two stage compressor or two
compressor system, Gas or Electric backup
SS 1 – Single Stage System
4) GAS or Electric (ELE) fan operation. If the heating sys-
tem requires the thermostat to energize the fan, select
ELE. Select GAS if the heating system energizes the fan
on a call for heat.
5) Select Cool Savings™ value – Selects the amount
of adjustment for the Cool Savings™ feature in Cool
mode with 1 (1°) being the least amount of adjustment
and 6 (6°) being the most amount of adjustment. Default
value is 0 which disables this feature. Selecting a value
greater than 0 will display Cool Savings on the screen
and enable the key for Cool Savings feature. Cool Sav-
ings is an optional energy saving feature that can reduce
your cooling costs. It is based on the principal that lower
indoor humidity makes a slightly higher temperature
feel more comfortable. Cool Savings operates during
periods of high demand which normally occur on the
hottest summer days when a cooling system may run
for hours to reach the thermostat setting. Long cooling
run times also lower the indoor humidity. Cool Savings,
very slowly, adjusts the setpoint temperature to make the
setpoint closer to the displayed room temperature, to a
maximum of the number of degrees you select. Adjust-
ing the setpoint temperature over a long cooling run time
allows the system to reach your set temperature and turn
off. The room temperature will actually be higher than
the thermostat displays but the reduction in humidity will
allow comfort at the slightly higher temperature.
To turn this feature on in the Cool mode press Cool
Savings. The display will show “Save” next to the
setpoint temperature. When Cool Savings is making ad-
justments to the room temperature display “Save” will be
flashing and the displayed room temperature may vary
within the adjustment range you selected.
If “Save” is not displayed and this feature is OFF, no
change will occur when the cooling system is continu-
ously running during periods of high demand.
6) Energy Management Recovery: Energy Management
Recovery (E) On enables the thermostat to start heating
or cooling early to make the building temperature reach
the program setpoint at the time you specify. Heating
will start approximately 5 minutes early for every 1° of
temperature required to reach setpoint.
Example: E On is selected and your heating is pro-
grammed to 65° at night and 70° at 7 AM. If the build-
ing temperature is 65°, the difference between 65° and
70° is 5°. Allowing 5 minutes per degree, the thermostat
setpoint will change to 70° at 6:35 AM. Cooling allows
more time per degree, because it takes longer to reach
set temperature.
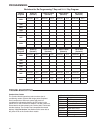
7, 8,9 & 10) Cycle Rate Selection – The factory default
setting for Heat and Cool modes, SS1, MS2, is medium
cycle (ME). For Heat Pump, HP1, HP2, the default set-
ting is medium (ME). For Emer (Aux) the default setting
is fast cycle (FA). To change cycle rate, press the
or
key.
Cycle rate differentials for different settings are:
Fast Medium Slow
MODE FA ME SL
Heat (SS1, MS2) 0.4°F 0.6°F 1.7°F
Cool (SS1, MS2) 0.9°F 1.2°F 1.7°F
Heat Pump (HP1, HP2) 0.9°F 1.2°F 1.7°F
Emer (HP1, HP2) 0.6°F - 1.7°F
11) Select Compressor Lockout CL OFF or ON – Select-
ing CL ON will cause the thermostat to wait 5 minutes
between cooling cycles. This is intended to help protect
the compressor from short cycling. Some newer com-
pressors already have a time delay built in and do not
require this feature. Your compressor manufacturer can
tell you if the lockout feature is already present in their
system. When the thermostat compressor time delay oc-
curs, it will flash the setpoint for up to five minutes.
12) System Mode Configuration – This thermostat is
configured for Heat and Cool (SYSTEM switch with Cool,
Off, Heat) default. It can also be configured for Heat and
Cool with Auto changeover (Heat, Auto, Cool, Off), Heat
only with fan (Off, Heat), Heat only without fan, Auto only
(Auto, Off), and Cool only (Cool, Off).
13) Select Backlight Display – The display backlight im-
proves display contrast in low lighting conditions. When
the “C” terminal is powered, selecting backlight CdL ON
will keep the light on continuously. Select backlight OFF
will turn the light on momentarily after any key is pressed.
When the “C” terminal is not powered, the light will be on
momentarily after any key is pressed no matter whether
the backlight is selected ON or OFF.
14) Select Temperature Display Adjustment 4 LO to 4 HI
– Allows you to adjust the room temperature display up
to 4° higher or lower. Your thermostat was accurately cali-
brated at the factory, but you have the option to change
the display temperature to match your previous thermo-
stat. The current or adjusted room temperature will be
displayed.
15) Select F° or C° Readout – Changes the display readout
to Celsius or Fahrenheit as required.
16 & 17) Temperature Limit Range Heat or Cool – This
selection sets the maximum HEAT (13) or minimum
COOL (14) temperature for the setpoint range. Select the
limit temperature using the
or keys. In the Run
mode, the setpoint temperature will not adjust past the
limit temperature selected. When the limit temperature is
reached, trying to raise or lower the setpoint past the limit
will cause “L” to be displayed in the times digits for about 6
seconds. This feature not available on earlier models.
18) Program Options: Configured for 7 day or 5/1/1 day pro-
gramming or non-programmable mode. The default set-
ting is P7, indicating 7 day programming. The programs