


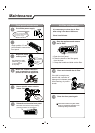

Installation instructions
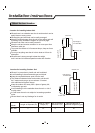
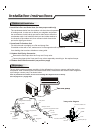
Piping Joints Thermal Insulation:
Wrap the piping joints with thermal
insulation materials and then wrap
with a vinyl tape.
Piping Thermal Insulation:
a. Place the drain hose under the piping.
b. Insulation material uses polythene foam over 6mm in thickness.
Note: Drain hose is prepared by user.
Drain pipe should point downward for easy drain flow.
Do not arrange the drain pipe twisted, sticking out or wave
around, do not immerse the end of it in water.
If an extension drain hose is connected to the drain pipe, make
sure to thermal insulated when passing along the indoor unit.
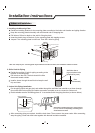
When the piping is directed to the right, piping, power
Cord and drain pipe should be thermal insulated and
fixed onto the back of the unit with a piping fixer.
Thermal insulation
wrapped with vinyl type
Small
pipe
Large pipe
Thermal insulation
tube
Power cord 1
(for heat-pump)
Power cord
Defrost cable(for heat-pump)
Drain hose
(prepared by user)
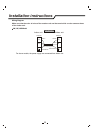
A. Insert the pipe fixer to the slot.
B. Press to hook the pipe fixer onto the base.
Base
Base
Base
Piping fixer
Piping fixer
Hook here
Insert here
drain
hose
drain
hose
large
pipe
large
pipe
small
pipe
small
pipe
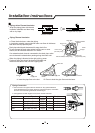
b. Pre-tighten them with fingers at first, then use the wrenches.
a. Connect indoor unit pipes with two wrenches. Pay special attention
to the allowed torque as shown below to prevent the pipes, connectors
and flare nuts from being deformed and damaged.
Piping Connection:
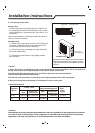
Pipe size
Model
Liquid Side (1/4 inch)
9,12K
12K
9K
18K
18K
1.8kg.m
17mm
0.6mm
0.6mm
0.6mm
0.6mm
0.6mm
22mm
24mm
22mm
27mm
3.5kg.m
3.5kg.m
5.5kg.m
7.5kg.m
Liquid Side (3/8 inch)
Gas Side (1/2 inch)
Gas Side (3/8 inch)
Gas Side (5/8 inch)
Torque
Nut width
Min.thickness
18