


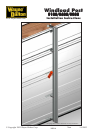
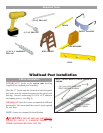
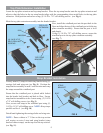

Top Plate Extension Installation
Locate the top plate extension and top strap bracket. Place the top strap bracket onto the top plate extension and
adjust so that the holes in the top strap bracket align with the corresponding door model holes in the top plate
extension. Hold position and secure using (4) 1/4-20 x 7/8” self-drilling screws. (see Fig. 6)
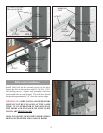
Slide the top plate extension assembly into the header bracket.
Now, install the windload post into the post hole in the
floor and align the top of the windload post with the top
plate extension assembly. Ensure that the post is level
and plumb.
Using (2) 1/4-20 x 7/8” self-drilling screws, secure the
windload post to the top plate extension assembly.
(see Fig. 7)
9100
9600/9900
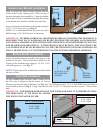
5
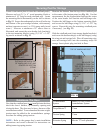
Loosely attach (2) straps to each strap bracket using (1)
carriage bolt and wing nut (see Fig. 8). Position the
strap bracket assembly at each J-strut location and wrap
the straps around the windload post.
Ensure that the windload post is plumb while locked
into the header lock bracket and hole in floor. Secure
strap bracket assemblies to the J-struts using (2) 1/4-20
x 7/8” self-drilling screws (see Fig. 9).
Now, secure each strap to the windload post using (1)
1/4-20 x 11/16” self-drilling screw. NOTE: Keep straps
parallel and level. (see Fig. 10)
Finish hand tightening the carriage bolts and wing nuts.
Strap Bracket Installation
NOTE: Doors without a 3” U-bar on the top section
will require an extra J-strut and strap bracket (strap
bracket without straps) on the top rib of the top section.
(see Fig. 11)
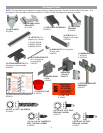
(4) 1/4-20 X 7/8”
SELF-DRILLING
SCREWS
TOP PLATE
EXTENSION
TOP STRAP
BRACKET
FIG. 6
(2) 1/4-20 X 7/8”
SELF-DRILLING
SCREWS
TOP PLATE
EXTENSION
ASSEMBLY
FIG. 7
BOLT
WING
NUT
(2) STRAP
FIG. 8
STRAP
BRACKET