


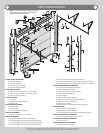
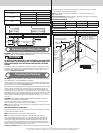
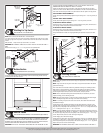
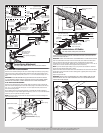

Cable drums RH/LH Torsion springs RH/LH
Center bracket
(as required)
Center bracket
bushing (as required)
(2) End bearing
brackets (as required)
Track roller carriers
(as required)
End bearing brackets
RH/LH (as required)
Keys
(as required)
Hinges (as required)
Bottom weather seal /
3/4” nails (as required)
Cotter pin
(as required)
5/16” x 1-1/4”
Clevis pin (as required)
Half Center
hinges (as required)
Center coupler
assembly (as required)
Drum spacers
(as required)
(2) Bottom corner brackets
(as required)
Weather seals
& nails (If included)
Strut clips
(as required)
Pull down rope
(if included)
(2) Bottom corner brackets
(as required)
(2) Bottom corner brackets
(as required)
1/4”- 20 Flanged
hex nuts (as required)
(2) 3/8”-16 x 3/4”
Truss head bolts
1/4” - 10 x 1”
Tamper-resistant hex head
lag screw (as required)
1/4” - 14 x 1”
Lag screws (as required)
(2) 3/8”- 16 Hex nuts
1/4”-20 x 9/16”
Track bolts (as required)
3/8”-16 x 1-1/2” Hex bolts
5/16” x 2” Tamper-resistant hex head
lag screw (as required)
Lift handles (as required)
1/4” - 14 x 1”
Lag screws (as required)
1/4” - 20 x 2 1/4”
Carriage bolts (as required)
5/16” x 1 5/8” Hex head lag screws
(as required)
1/4”-20 x 7/8” Self
drilling screws (as required)
1/4” - 20 x 2 1/4”
Carriage bolts (as required)
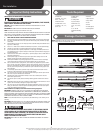
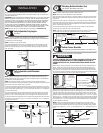
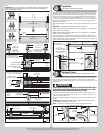
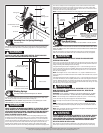
Door Section Identification
When installing your door, you must use sections of the appropriate height in the right stacking
location. Determine, what sections you need to use in what order depends on the design of your
door.
Sections are stamped for identification, #1, #2, #3, and #4 (#4 only on four section high doors).
The stamp, located on each side of the sections identifies the stacking sequence. The sequence
is always determined by #1 being the bottom section to #3 or #4 being the highest top section.
If the stamp on the section is illegible, refer to the section side view illustration. The section side
view illustration shows the section profile of all sections, and can also be used to identify each
section.
The BOTTOM SECTION can be identified by #1.
The INTERMEDIATE I SECTION can be identified by #2.
The INTERMEDIATE II SECTION can be identified by #3, for a 4 section high door only.
The TOP SECTION can be identified either by a #3, for a 3 section high door or by a #4, for a 4
section high door.
Bottom
rail
Bottom
rail
Typical
stamping
location
Top rail
Typical design option “Outside surface of
door sections shown”
Bottom
section
Intermediate(s)Top
section
Side views of sections
Outside
surface
Inside
surface
1.
Bottom
section
2.
Intermediate I
section
3.
Intermediate II
section
4. or 3.
Top
section
# # 1
NOTE: 3 Section high doors do not have an
Intermediate II Section.
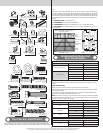
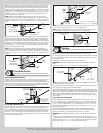
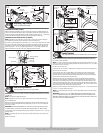
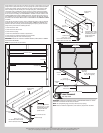
Graduated End Hinge And
Strut Identification
Graduated End Hinge Schedule
Door Height Section Type Graduated End Hinge Number
Less than or equal to 7’3”
Top N/A
Intermediate I #4
Bottom #2
Greater than 7’3”
Top N/A
Intermediate II 3#
Intermediate I 2#
Bottom 1#
NOTE: Center hinge(s) use #1 graduated end hinges at each pre-drilled or vertical stile location.
The pre-drilled locations are located at the top and or bottom rails on the inside of the section
surface.
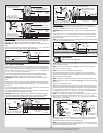
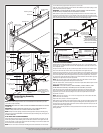
STRUT IDENTIFICATION:
Identify your struts to determine which ones are long strut(s) or short strut(s).
Short Strut(s) are typically installed along the top rail of the top section and or along the bottom
rail of the bottom section.
Long Strut(s) are typically installed along the top and or bottom rails of sections. Measure the
height of the long strut(s) to determine if you have 2” or 3”.
NOTE: Some struts also may or may not have holes in them. If they don’t, then prior to installing
the strut and hinge to the section surface, you may have to drill a 3/16” hole for the appropriate
fastener on one or both sides of the strut legs.
3 Section High Strutting Schedule
Section Type Type Of Strut Location On Section
Top
(1) Short Top Of Section
N/A Bottom Of section
Intermediate I
(1) Long Top Of Section
N/A Bottom Of section
Bottom
(1) Long Top Of Section
(1) Short Bottom Of section
4 Section High Strutting Schedule
Section Type Type Of Strut Location On Section
Top
(1) Short Top Of Section
N/A Bottom Of section
4
Please Do Not Return This Product To The Store. Contact your local Wayne-Dalton dealer. To find your local Wayne-Dalton dealer,
refer to your local yellow pages business listings or go to the Find a Dealer section online at www.Wayne-Dalton.com