


Please Do Not Return This Product To The Store. Call Us Directly! Our Trained Technicians Will Answer Your Questions and/or Ship Any Parts You May Need
You can reach us Toll Free at 1-888-827-3667 for Consumer Assistance or online at www.wayne-dalton.com
2
2
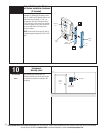
Positioning and Installing
Front Wall Bracket
NOTE: It is recommended that the door
opener be installed 7 feet or more above the
garage floor.
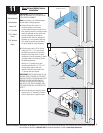
REINFORCE THE HEADER WALL
Reinforce the header wall (wall above door
opening) as required, to ensure rigid
mounting of the front wall bracket.
DO NOT ATTEMPT TO LOOSEN OR
REMOVE ANY PORTION OF DOOR SPRING
SYSTEM IN ORDER TO REINFORCE
HEADER WALL OR TO MOUNT WALL
BRACKET. SPRING SYSTEM IS UNDER
EXTREME TENSION AND CAN CAUSE
SEVERE OR FATAL INJURY. SUCH WORK
SHOULD BE DONE BY A QUALIFIED
SERVICE PERSON.
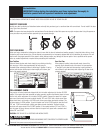
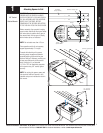
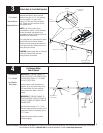
Locate the vertical center line of the garage
door and mark it on the header above the
door.
Raise the door slightly until the top section
reaches the highest point of travel (High Arc
Point); using a carpenter’s level, transfer
and mark the highest point of travel onto the
header wall and close the door.
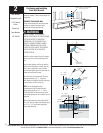
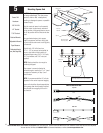
Mount the front wall bracket with its lower
edge approximately 1/2” -1” above the
mark showing the highest point of travel and
centered on the vertical center line.
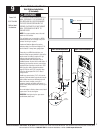
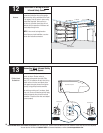
NOTE: For low headroom torsion
counterbalance, hold the wall bracket’s
bottom edge typically at 1/2” - 1” (room
permitting) above the torsion spring center
bracket and centered on the vertical line, see
illustration.
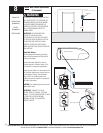
Mark the two mounting holes and pilot drill
with a 1/8” drill bit. Mount wall bracket using
the 1/4” x 1-1/2” lag screws supplied to
ensure rigid mounting.
WARNING
Reinforce with 2” x 6” as required to
insure rigid mounting.
Vertical Center Line
High Arc Point
Sectional Door
Curved Track
Carpenter’s Level
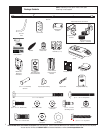
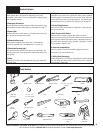
Tools Needed:
Carpenter’s Level
7/16” Socket
Driver
Power Drill
Tape Measure
1/8” Drill Bit
1/2” - 1” Above
High Arc Mark
Center of
Door
1/4” X 1 1/2”
Lag Screws
Front Wall
Bracket
Torsion Spring
Center Line
High Arc
Mark
Top Edge Of
Center Bracket
1/2” - 1” Above
Center Bracket
(Room Permitting)
Center Bracket
Top Section
Header
Front Wall
Bracket