


18 Waterford E61 Gas Fireplace Insert
MAINTENANCE
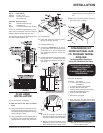
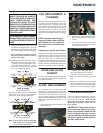
Remove the 2 screws holding the
Control Panel in place.
VALVE MAINTENANCE
If your valve requires maintenance or replace-
ment, use the following instructions:
Note: Always close off the gas supply
before removing the valve.
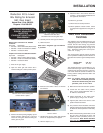
1) Shut off the gas supply.
2) Open the lower grill and remove the 2
screws holding the control panel in place.
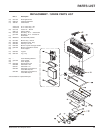
7) Carefully lift the burner tray assembly out.
8) Disconnect the 2 TP wires and the 2 TH
wires from the valve.
5)
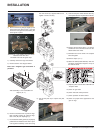
Lift fan off of the 2 pins, tip forward and pull
through the firebox opening.
Thermodisc access is through the Fan
Access Panel.
Replacing fan:
Reverse steps (1-5 on removing the fan). Al-
ways install a new gasket (Part# 270-041)
before replacing the fan access panel. Make
sure the fan wires are reattached.
Hint for pushing fan down onto pins - rub a bit
of dish soap on the grommet so it will slide more
easily onto the pin. Check to make sure the fan
is seated properly on the pins - try to move the
fan back and forth, there should be no noise,
if there is check that the grommets haven't
come loose.
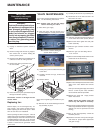
To remove fan:
1) Unplug or disconnect power source to
stove.
2) Remove all logs and the rear log support,
then remove the 12 screws holding the
access panel in place.
3) Disconnect the Mini-Universal Mate-N-Lok
connector on the fan wiring harness.
4) Remove the green ground wire from
the fan bracket.
3) At this point you should disconnect the gas
at the valve.
4) Carefully remove the logs, embers and
rockwool.
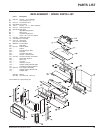
5) Remove burner.
Note: Use a magnetic type screwdriver if pos-
sible.
6) Remove all 18 screws holding the burner
tray assembly in place.
9) Undo the quick drop out thermocouple nut
on the valve with a 9mm (metric) wrench.
10)Remove the Piezo ignitor wire and push
button assembly.
11)Undo the "gas out" flare nut with a 13/16"
wrench.
12)
Undo the "gas out" flare fitting with an
11/16" wrench.
13)Remove the 4 Phillips head screws on the
inside base of the burner tray.
14)Remove the 4 Phillips head screws from the
sides of the valve bracket and remove
valve.
Hint: If you are using black pipe, ensure that
there is a union by the valve, otherwise
removal will be almost impossible.
15)Replace the valve and simply reverse
above instructions.
NOTE: Check the gasket under the
burner tray and replace if necessary.
16)Hook up the gas line and check for gas leaks
with a soap and water solution or a gas leak
detector. (Do not use open flame for leak
testing.)
17)Fire up the unit temporarily. Check the
manifold pressure.
18)Close the front door. Fire up the unit again
and check for proper flame appearance
and glow on logs.
IMPORTANT
Disconnect power supply
before servicing
WARNING:
Electrical Grounding Instructions
This appliance is equipped with a
three pronged (grounding) plug
for your protection against shock
hazard and should be plugged
directly into a properly grounded
three-prong receptacle. Do not cut
or remove the grounding prong
from this plug.