


5USSC
INTRODUCTION
Thank You for your purchase of a U.S. Stove Wood/Coal
Burning External Furnace. Your decision to buy our Clay-
ton Furnace was undoubtedly reached after much care-
ful thought and consideration. We are very proud you
chose this furnace and trust you will receive the comfort
and economy that others realize when heating with a U.S.
Stove product.
Your dealer is important in your experience with the fur-
nace not only with the purchase, but for recommen-
dations for professional installation for your home. The
qualied professional installer has been expertly trained
in solid-fuel furnace installation to assure the safety and
comfort for your family while saving you money. Trust your
experienced installer. They are specialist in this eld.
Before installing and using your furnace, please read the
following pages thoroughly and carefully. If you follow the
instructions, your furnace will give you safe and more de-
pendable service for years to come.
• Check your local codes. This installation must
comply with their rulings.
• This is an outdoor hot air furnace and must NOT
be installed inside the home or a building.
• This furnace must be connected to a 110 volt
Ground Fault Circuit Interrupter (GFCI) outlet suit-
able for outdoor use.
• A back-up generator, 2,000 watts minimum, is
recommended in case of a power failure.
• Always have a properly functioning smoke or
ionization detector and a CO detector installed
in your home.
• To prevent injury or damage, do not allow any-
one who is unfamiliar with the furnace to operate
it.
• Spend adequate time with your furnace to be-
come well acquainted with the different settings
and how each will affect its burning patterns. It
is impossible to state just how each setting will
affect your furnace because of the variations in
each installation.
The BTU ranges and heating capacity specications are
provided as a guide and in no way guarantee the output
or capacity of this unit. The actual BTU output depends
on the type of fuel being burned and its conditions, the
thermostat setting, the draft adjustment and the chimney
to which the unit is attached. The actual area that this
unit will heat depends on factors such as the conditions
of the building, heat loss, type of construction, amount of
insulation, type of air movement, the location of the unit
and more importantly the duct work and return air facility.
Warning:
Do not alter this appliance in any way other than speci-
ed in these instructions. Doing so may void your warranty.
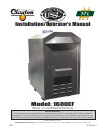
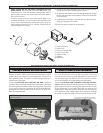
Your 1600EF furnace comes ready for installation. No as-
sembly required. Unpack your furnace and insure that
there is no shipping damage. If damage exist, please
contact your dealer immediately. Review the items in-
cluded with your furnace located inside the rebox.
1 - 10” Starter Collar
1 - 12” Starter Collar for Cold Air Return
8 - #10 x 3/4 Screws w/ Sealing Washer
1 - Literature Package
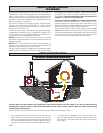
This furnace may be installed as a Stand-Alone Central
Furnace or as a Supplementary Furnace. If installed as a
Central Furnace, this unit will have it’s own central ducting
system and will essentially be your primary heat source.
If installed as a Supplementary Furnace, the 1600EF will
assist an Electric, Gas or Oil Fired Furnace in heating your
home by utilizing the existing furnace’s duct work system.
The 1600EF must not be wired in conjunction with the exist-
ing furnace. The outdoor furnace may be operated with
the supplied wall thermostat or a 24 volt thermostat that
you supply yourself.
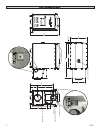
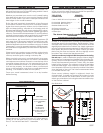
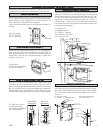
The furnace should be placed outdoors on a level non-
combustible base, preferably a 4’ x 8’ concrete pad, as
close to the home as clearances to combustibles will al-
low. If locating the furnace more than 10 feet away from
the home, a minimum of 6 feet of Class “A” HT 2100 All
Fuel 6 inch chimney pipe is required - Do not place the
furnace more than 40 feet away from the home. Maintain
all clearances stated in this manual.
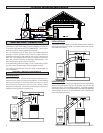
Class “A” HT 2100 All Fuel 6” Chimney Pipe is recommend-
ed for optimum performance and can be purchased
from your local dealer. A Chimney Base Plate should
be installed over the ue outlet and sealed to maintain
weather resistance. A 2” clearance to combustibles must
be maintained from the pipe. We suggest using either
Simpson Dura-Vent or Metal Fab chimney products for
your installation.
If you choose to use single wall stainless, the ue temper-
atures will be reduced which promotes the formation of
creosote, possibly creating a re hazard. If you use single
wall stainless pipe, the minimum clearance to combus-
tibles is 20”.
Attach the appropriate chimney pipe lengths to the cho-
sen chimney base plate and nish with a rain cap. Secure
the chimney with guy wires to each of the four anchors
point on the furnace. Your furnace requires it’s own chim-
ney system and can not share a ue with another appli-
ance.
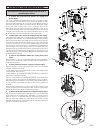
Once you have selected a location for the furnace and
connected your furnace to a chimney and a 110 volt GFCI
outlet, you will need to commence an initial ring. DO NOT
connect the furnace to your duct work at this time. Your
new furnace has a protective coating of oil and paint on
the surface which could produce smoke or odors during
the initial ring and will burn off. Build a small re - DO NOT
ll the rebox to it’s full capacity for the initial burn. This
initial ring allows the metals and castings to cure.
After completing the ring and allowing it to cool, you are
ready to nish the installation. Refer to the remainder of
this manual for detailed instructions.
GENERAL INFORMATION
IMPORTANT
DISCLAIMER NOTICE