


2319 Laurelbrook Street, Raleigh, NC 27604 · (800) 542-7221 · FAX (919) 834-4526 · www.ultimate-products.com
-
14
-
A.10 INSTALLATION CHECK OUT AND START UP
Inspect installation and ensure that it has been carried out in accordance with
these instructions. Ensure that electrical and gas supplies are isolated.
The gas supply should be purged and tested for soundness in accordance with
Local and National Safety codes.
Open isolating gas valve and test gas connections for soundness using soap
solution.
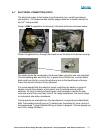
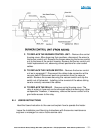
Remove burner cover plate by unscrewing 6 screws. Take care not to damage
the sealing gasket. Inspect the burner and electrode assemblies ensuring these
are securely fixed and all electrical connections securely made. Replace the
burner cover plate ensuring that the sealing gasket is correctly positioned and the
six screws are fully tightened. The heater will not operate until this plate is
refitted.
Remove the control housing cover plate by unscrewing the five securing screws.
Ensure all internal components are securely fixed and all connections securely
made. Open the manual gas valve.
Switch on the electrical supply to the heater and observe the correct start up
sequence. Ensure that the settings of any time switch and thermostat are such
that the heating system will be required to operate.
The fan will start to run and “Power On” lamp will illuminate. Safe-start checks
are carried out automatically.
After the fan has run up to full speed and a satisfactory vacuum condition has
been established, ignition sequence will commence. The spark ignition will be
energized producing a spark at the ignition electrode. The gas valve will at the
same time be energized.
If the ignition is successful the flame sensing probe and the ignition spark is
switched off. The ‘burner on” lamp indicates that the gas solenoid valve is
energized.
If ignition is unsuccessful the gas valve will close and the spark ignition de-
energized after approximately 6 seconds. For approximately 10 to 20 seconds
the fan will purge the system then re-ignition will be attempted. After three (3)
attempts at ignition the control unit will “lock-out” - the “power on” lamp will
remain illuminated and the fan will continue to run. To reset after “lock-out” switch
off the power supply to the system and wait 5 minutes. Then turn the power on.
If repeated “locked-out” occurs investigate the cause.