


15
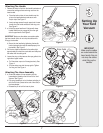
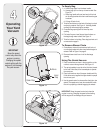
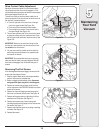
Drive Control Cable Adjustment
Adjust the drive control cable if the yard vacuum does
not self propel with the drive control engaged, or if the
unit hesitates while the engine maintains the same speed
after approximately 20 hours of use.
To move the z-fitting of the drive control cable from its
factory set position in the front hole of the drive control to
the rear hole, proceed as follows:
1. a. Push the right side of the control out of the right
hole in the upper handle. See Figure 15A.
b. Pivot control down towards the lower handle.
c. Pivot straight up to remove it from the left hole in
the upper handle. See Figure 15A.
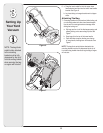
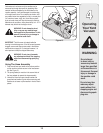
2. There is now sufficient slack in the drive control cable
to grasp the z-fitting with your hand and move it from
the front hole to the rear hole of the drive control. See
Figure 15B.
IMPORTANT: Make sure to insert the z-fitting into the
rear hole as it was inserted in the front hole, that is from
the outside of the drive control.
3. You may now carefully reinstall the drive control by
performing the previous steps in the opposite order
and manner of removal.
IMPORTANT: Once assembled and prior to restarting,
make sure that the cable is properly adjusted. With the
drive control disengaged, the unit should freely pull in
reverse.
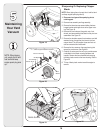
Removing The Flail Screen
If the discharge area becomes clogged, remove the flail
screen and clean area as follows.
1. Stop the engine. Make certain the chipper/shredder
vacuum has come to a complete stop.
2. Before unclogging the discharge chute, disconnect
and ground the spark plug wire to retaining post.
3. Remove the vacuum bag or blower chute from the
unit as instructed in the OPERATION section to obtain
access to flail screen.
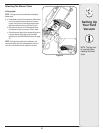
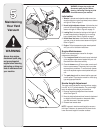
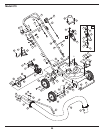
4. Remove the three self tapping screws securing the
belt cover, and remove the belt cover. See Figure 16.
5. Remove self tapping screw on right side of unit that
attaches to the flail screen. See Figure 17.
6. Remove hex screw on top of rear housing near
mounting bracket and the flange lock nut that secures
flail screen. See Figure 17.
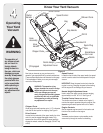
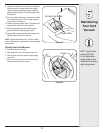
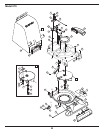
7. Remove and clean the screen by scraping or washing
with water. See Figure 18.
8. Reinstall the screen.
Figure 16
Figure 17
5
Maintaining
Your Yard
Vacuum
Figure 18