


5
Eliminator SE400E & SE800E
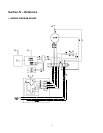
Section II – Installation
1. INSTALLATION
CAUTION:
ELECTRONIC AIR CLEANERS
CANNOT BE USED IN AREAS WHERE
COMBUSTIBLE GASES OR VAPORS
ARE PRESENT.
MECHANICAL
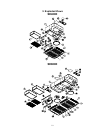
The unit has been designed so that it can fit
either surface mounted onto the ceiling,
semi-recessed into a T-Bar suspended
ceiling or wall mounted (SE400E only).
When installed with a T-Bar suspended
ceiling NEVER support the unit from the T-
Bars, the unit must be supported from the
permanent ceiling.
SUSPENDED CEILING INSTALLATION
To hang the unit into a suspended ceiling,
proceed as follows:
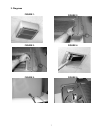
a) Unpack the unit, open filter access door
and remove prefilter and cell (see filter
removal in section 2).
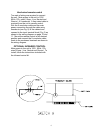
b) Install ¼-20 eyebolts into mounting slots
with large diameter washers and lock-nuts as
shown in sketch A. Alternatively, use drop
rods.
c) Install trim as shown in sketch A.
d) Select and remove a ceiling tile near the
center of the area to be cleaned by the unit.
e) Attach a length of safety chain to each of
the four eyebolts or fit threaded rod. Fasten
securely.
f)
Lift unit into place and support unit while
securing to permanent ceiling, ceiling
joists, etc. See sketch A.
CAUTION:
IT IS THE RESPONSIBILITY OF THE
INSTALLER TO ENSURE ADEQUATE
MOUNTING COMPONENTS ARE USED.
DO NOT ALLOW WEIGHT OF UNIT TO
REST ON SUSPENDED CEILING
SUPPORT RAILS.
g) Make electrical connections as detailed in next
section.
h) Re-install cell and prefilter.
i) Close access door and unit is ready for
operation.
SOLID CEILNG MOUNTING
To mount the unit to a solid ceiling, proceed
as follows:
a) Unpack the unit, open filter access door
and remove prefilter and cell (see filter
removal in section 2).
b) Select a location near the center of the
area to be cleaned. lf you are fitting to
wooden ceiling joists, locate the position
of joists.
c) Using the template provided, drill four
holes into the ceiling and fit four 5/16 lag
screws in the joists. Hex-headed screws
will give easier access for final tightening.
Do not tighten fully home.
d) Lift the unit to where the large end of the
keyhole slots in the top of the cabinet fit
over the screw heads. Slide the unit so
that the narrow ends of the mounting
slots are located under the screw heads.
Tighten the screws fully home.
e) Install the lockdown location screw as
shown on template.
f) Make electrical connections as detailed in
next section.
g) Re-install cell and pre-filter.
h) Close access door and unit is ready for
operation.
WALL MOUNTED (SE400E Only)
Filter removal will be simpler if the unit is
positioned with the access door hinge in a
vertical plane. Locate the wall studs and
follow the mounting instructions for SOLID
CEILING MOUNTING.
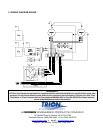
ELECTRICAL:WARNING:
THIS APPLIANCE MUST BE
ELECTRICALLY GROUNDED.
NOTE: This unit is designed to be
permanently connected to fixed
wiring. Installation must comply with
all applicable electrical codes.