


NOTE: DIAGRAMS & ILLUSTRATIONS ARE NOT TO SCALE.
9
INSTALLING THE CHIMNEY SYSTEM
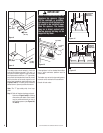
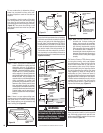
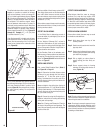
Step 1. Check flue damper for proper operation.
To open, push handle up and release.
Damper will open automatically. To
close, pull handle down and release
damper will fall to the closed posi-
tion.
Note: The damper may be operated from both
firebox openings.
CAUTION
Allow minimum 2" (51 mm)
chimney air space to combus-
tible framing members through-
out vertical or offset chimney
installation. Also maintain air
space on top of the fireplace
as defined by the spacers and
standoffs.
A minimum 2" (51 mm) air space must be
reserved for all combustible materials extend-
ing for any continuous length surrounding the
chimney.
Reference Figures 15 and 16 on Page 8,
which specify minimum ceiling and roof di-
mensions.
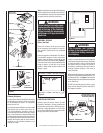
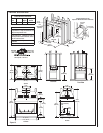
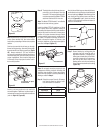
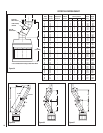
Figure 18 - Outside Combustion Air Kit
Cut or frame a hole through the outside wall for
the installation of the duct inlet hood. A 6 1/2”
(151 mm) diameter hole is sufficient. Feed the
loose end of the flexible air duct through the
hole cut for the inlet hood and attach to collar
on inlet hood using the tie strip provided. Insert
hood into opening. Secure in place with the
No. 8 x 1-1/2” screws provided or with nails
driven through holes in hood flange. Seal with
noncombustible waterproof silicon type caulk-
ing. If additional length of duct is necessary,
purchase locally available Class 0 or Class 1
ducting. The duct may extend up to 50' (15.2
m) in any direction.
Note: Do not terminate combustion air kit in
attic space under any circumstances.
CAUTION
Never locate the air inlet where
it could be blocked by shrubs,
leaves, snow drifts, etc. Never
locate the air inlet in garage or
any area where there is another
fuel burning appliance or prod-
ucts emitting combustible gases
such as paint, gasoline, etc.
In cold climates, it is recom-
mended that the combustion air
duct be insulated.
CAUTION
In no event may the total duct for
bringing in outside air exceed
50' (15.2 m).
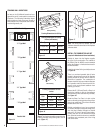
Step 2. Using standard construction framing
techniques, construct opening for chim-
ney route up through the ceiling(s) and
roof or through an outside chase.
Framing must maintain adequate mini-
mum air space clearance at all times.
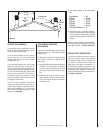
Air Inlet Assembly
(Attach To Floor)
Non-Combustible
Class 0 Or Class 1
6 Inch Air Inlet Duct
Actuator
Arm
Clamp
Securely
At Top And
Bottom
Vented Crawl Space