


33
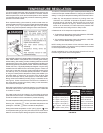
The anode rod is used to protect the tank from corrosion. Most hot water
tanksareequippedwithananoderod.Thesubmergedrodsacrices
itself to protect the tank. Instead of corroding tank, water ions attack
andeatawaytheanoderod.Thisdoesnotaffectwater’stasteorcolor.
The rod must be maintained to keep tank in operating condition.
Anode deterioration depends on water conductivity, not necessarily
water condition. A corroded or pitted anode rod indicates high water
conductivity and should be checked and/or replaced more often than
an anode rod that appears to be intact. Replacement of a depleted
anode rod can extend the life of your water heater. Inspection should
beconductedbyaqualiedtechnician,andataminimumshouldbe
checked annually after the warranty period.
TEMPERATURE-PRESSURE RELIEF VALVE TEST
DANGER
• Burn hazard.
• Hot water discharge.
• Keep clear of Temperature-
Pressure Relief Valve
discharge outlet.
It is recommended that the Temperature-Pressure Relief Valve should be
checked to ensure that it is in operating condition every 6 months.
When checking the Temperature-Pressure Relief Valve operation, make
surethat(1)nooneisinfrontoforaroundtheoutletoftheTemperature-
PressureReliefValvedischargeline,and(2)thatwaterdischargewill
not cause any property damage, as water may be extremely hot. Use
care when operating valve as the valve may be hot.
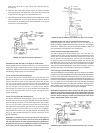
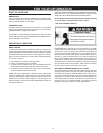
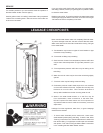
To check the relief valve, lift lever at the end of valve several times,
see Figure 28. The valve should seat properly and operate freely.
If after manually operating the valve, it fails to completely reset and
continues to release water, immediately close the cold water inlet to
the water heater and drain the water heater, see Draining And Flushing
on page 31. Replace the Temperature-Pressure Relief Valve with a
properly rated/sized new one, see Temperature-Pressure Relief Valve
on page 15 for instructions on replacement.
DISCHARGE PIPE
TEMPERATURE-PRESSURE
RELIEF VALVE
Figure 28.
If the Temperature-Pressure Relief Valve on the water heater weeps
or discharges periodically, this may be due to thermal expansion.
Note: Excessive water pressure is the most common cause of
Temperature-Pressure Relief Valve leakage. Excessive water system
pressureismostoftencausedby“thermalexpansion”ina“closed
system.”SeeClosedWaterSystemsandThermalExpansionon
page 29. The Temperature-Pressure Relief Valve is not intended for
the constant relief of thermal expansion.
Temperature-Pressure Relief Valve leakage due to pressure build
up in a closed system that does not have a thermal expansion tank
installed is not covered under the limited warranty. Thermal expansion
tanks must be installed on all closed water systems.
DO NOT PLUG THE TEMPERATURE-PRESSURE RELIEF VALVE
OPENING. THIS CAN CAUSE PROPERTY DAMAGE, SERIOUS
INJURY OR DEATH.
Explosion Hazard
Temperature-Pressure Relief Valve
must comply with ANSI Z21.22-
CSA 4.4 and ASME code.
Properly sized Temperature-Pressure
Relief Valve must be installed in
opening provided.
Can result in overheating and
excessive tank pressure.
Can cause serious injury or death.
DRAINING AND FLUSHING
It is recommended that the water heater storage tank be drained and
ushedevery6monthstoreducesedimentbuildup.Thewaterheater
should be drained if being shut down during freezing temperatures.
See Typical Installation section in this manual for location of the water
heater components described below.
DANGER
• Burn hazard.
• Hot water discharge.
• Keep hands clear of drain
valve discharge.
TO DRAIN THE WATER HEATER STORAGE TANK:
1. Turn off the electrical supply to the water heater.
2. Turn off the gas supply at the Main Gas Shutoff Valve if the water
heater is going to be shut down for an extended period.
3. Ensure the cold water inlet valve is open.
4. Open a nearby hot water faucet and let the water run until the
water is no longer hot.
5. Close the cold water inlet valve to the water heater.
6. Connect a hose to the water heater drain valve and terminate it
to an adequate drain.
7. Open the water heater drain valve and allow all the water to drain
from the storage tank.
8. Close the water heater drain valve when all water in the storage
tank has drained.
9. Close the hot water faucet opened in Step 4.
10. If the water heater is going to be shut down for an extended period,
the drain valve should be left open.
TO FLUSH THE WATER HEATER STORAGE TANK:
11. Turn off the electrical supply to the water heater.
12. Ensure the cold water inlet valve is open.
13. Open a nearby hot water faucet and let the water run until the
water is no longer hot. Then close the hot water faucet.
14. Connect a hose to drain valve and terminate it to an adequate drain.
15. Ensure the drain hose is secured before and during the entire
ushingprocedure.Flushingisperformedwithsystemwater
pressure applied to the water heater.
16.Openthewaterheaterdrainvalvetoushthestoragetank.
17. Flush the water heater storage tank to remove sediment and allow
thewatertoowuntilitrunsclean.
18.Closethewaterheaterdrainvalvewhenushingiscompleted.
19. Remove the drain hose.
20. Fill the water heater - see Filling The Water Heater in this manual.
21. Turn on electrical supply to place water heater back in operation.
22. Allow the water heater to complete several heating cycles to ensure
it is operating properly.