


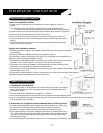
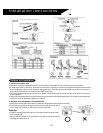

Outdoor unit installation location:
l
Outdoor unit location must be well ventilated. Avoid installing where any type of flammable
gas could leak.
l
Proper clearances must be maintained per instructions on page 16.
l
The maximum length for refrigeration lines is 49 ft. For refrigeraton lines exceeding 23ft. an
additional .75 pounds must be added per 3.5 feet.
l
The Maximum height between indoor and outdoor units in 25ft. If the outdoor unit is located
above the indoor unit more than 4 ft., a suction line oil trap must be installed.
l
The outdoor unit must not be located in environments that have high contents of acidic
substances, vulcanized gasses, or high salt contents in the air.
l
The outdoor unit must not be located near locations where dirt, mud, or debris can be caked
onto the outdoor coil or unit.
l
The foundation that the outdoor unit sits on must be solid and sound so as to decrease noise vibration.
l
No obstructions should be placed around the outdoor unit.
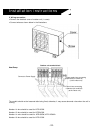
Select the installation locations
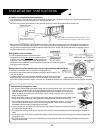
Indoor unit installation location:
l
Locate indoor unit so that there is not obstruction near the supply air or return air
outlets.
l
The wall that the indoor unit hangs on must be free from internal obstructions to
facilitate a clear hole for the refrigeration lines and condensate line to go through.
l
Proper clearances must be maintained to ceilings and walls per instructions on page 16.
l
Easy access must be maintained for removal of the air filter.
l
Indoor unit and remote control must be at least 3 feet from televisions, radios, etc.
l
Indoor unit and remote control must be kept out of direct sunlight and/or fluorescent
lighting.
l
The wall that the indoor unit hangs on must strong enough to bear the weight of the
unit to ensure quieter operation.
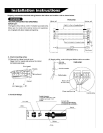
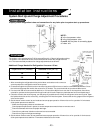
Indoor unit installation
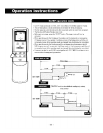
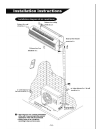
1. Installing the mounting plate
l
Hold mounting plate on the wall where unit will be located. Using a level or plumb line,
ensure that the plate is level. Once the plate is level, mark holes that will be used to
hold plate on the wall.
l
Remove plate and drill marked hole at a depth of 1.75 inches.
l
Insert the screw plugs into the holes and affix the mounting plate using the tapping screws.
l
Once mounting plate is securely fastened to the wall, then locate an area on the wall for the access hole for the refrigeration
line/condensate line/wiring bundle.
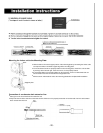
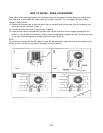
2. Access hole for refrigeration lines/condensate drain line/wiring bundle.
l
These directions must be followed at least for the condensate drain line. There must
be rear access for the condensate drain line to drain properly from the unit.
l
Decide on a location for the access hole according to the location of the unit.
l
Drill an approximately 2.5 inch hole, making sure that there is a tilt downward of a 1/4
inch. This will ensure that proper drainage is maintained for the condedsate drain line.
(If you are not using rear access for the refrigeration lines and wiring, hole will does
not need to be as large.)
l
It is recommended that a wall sleeve of some sort (i.e. PVC pipe) be used to keep the hole neat and tidy.
Note: The shape of your mounting plate may be different from
the one above, but installation method is simllar.
Installation instructions
- 17 -