19
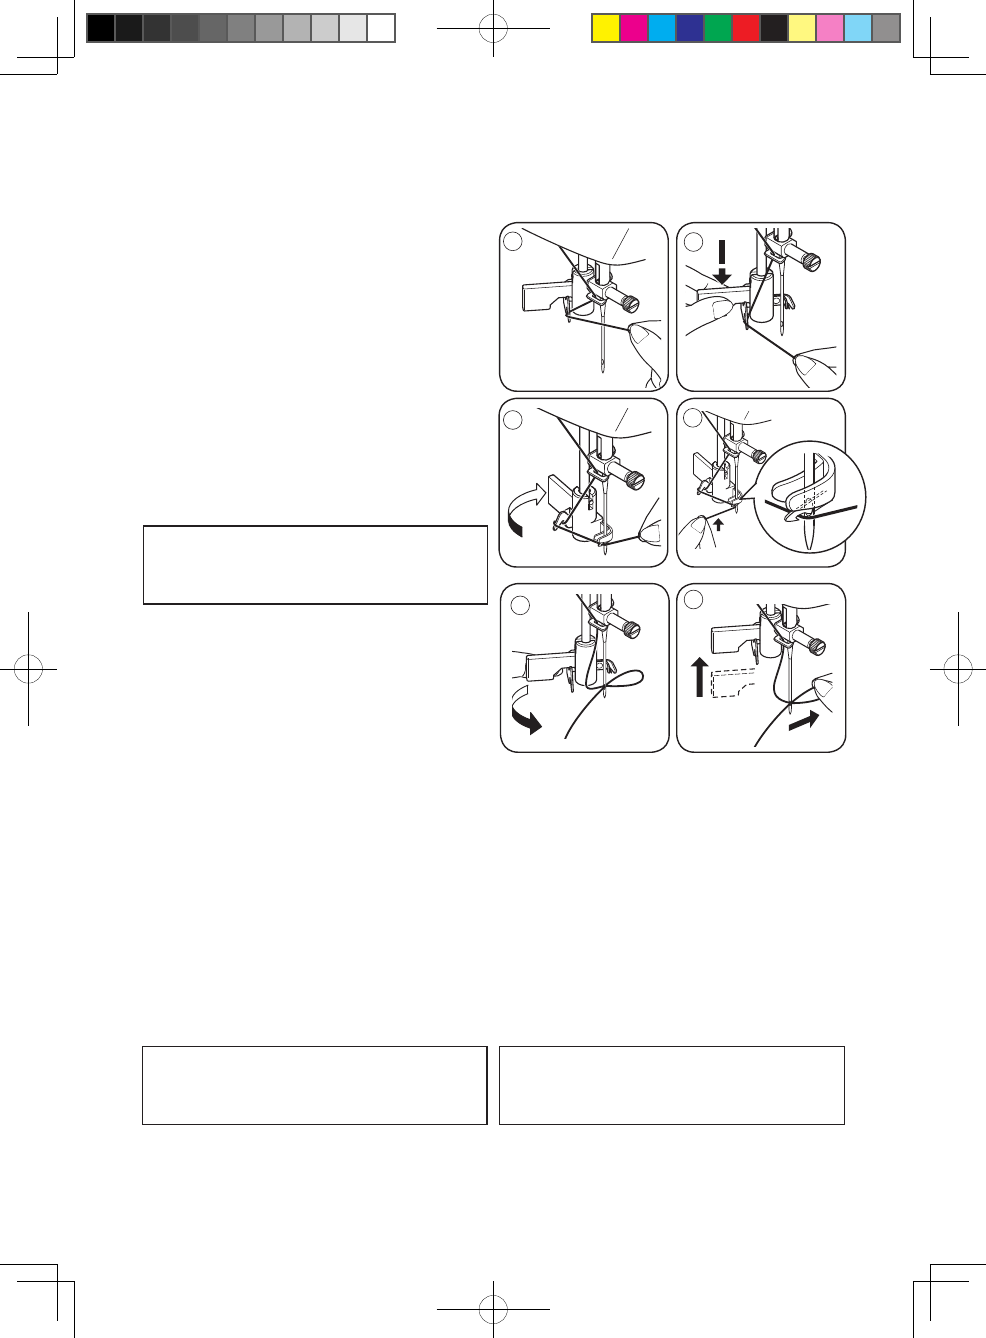
1. Hook thread into thread guide as
illustrated.
2. Pull down lever while holding the end of
thread.
3. Rotate the lever to the rear of the
machine.
4. Guide thread into hooked end and pull
the thread upward.
5. Return the lever and needle will be
threaded automatically.
6. Release the lever and pull thread away
from you.
NOTE: For smooth threading it is
recommended you set the machine
for straight stitch when using the
needle threader.
USING AUTOMATIC NEEDLE THREADER
Raise the needle to its highest position
by rotating the hand wheel towards you
(counter-clockwise).
1. Enganche el hilo en el guía hilo como la
indica la ilustración.
2. Empuje hacia abajo la palanca mientras detiene
la punta del hilo.
3. Girar la palanca hasta el nal.
4. Colocar el hilo en la horquilla de enganche y
estirarlo hacia arriba.
5. Retornar la palanca a su posición y la aguja
será enhebrada automáticamente.
6. Soltar la palanca y tirar del hilo hacia usted.
REMARQUE: Afin de faciliter l’enfilage,
il est recommandé de régler votre
machine au point droit lors de
l’utilisation de l’enleur d’aiguille.
NOTA: Para un mejor enhebrado con
el ensartador automático de aguja, se
recomienda colocar el selector de la
máquina en puntada recta.
UTILISATION DE L’ENFILEUR DE CHAS D’AIGUILLE
Amenez l’aiguille en position haute
en tournant le volant vers vous (sens
antihoraire).
1. Accrochez le fil au guide-fil comme
indiqué dans l’illustration.
2. Abaissez le levier tout en tenant
l’extrémité du l.
3. Tournez le levier vers l’arrière de la
machine.
4. Guidez le fil dans la fourchette
d’accrochage et le tirer vers le haut.
5. Ramenez le levier à sa position
d’origine, et l’aiguille sera alors
automatiquement enlée.
6. Relâchez le levier et tirer le fil vers
l’extérieur.
EMPLEO DEL ENSARTADOR AUTOMÁTICO DE AGUJA
Levantar la aguja a la posición más elevada
girando el volante de la máquina hacia usted (en
sentido contrario a las manecillas del reloj).
4
1
2
3
5
6


