


40
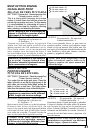
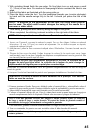
Under side
Côté de dessous
Reverso
Top side
Côté de dessus
Cara
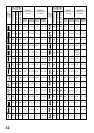
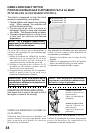
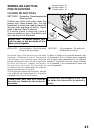
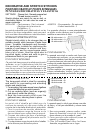
SETTINGS
:
Presser foot - General Purpose Foot
:Thread tension control - 5
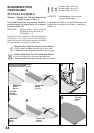
The light grey boxes indicate all
the possible personal preference
options available to set manually.
Dark grey box indicates the 5/
default value set automatically
when the pattern is selected.
For the zigzag pattern the stitch length is 2
mm and the stitch width is 5 mm.
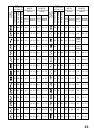
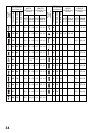
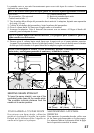
ADJUSTING STITCH WIDTH AND LENGTH
STITCH LENGTH
LONGUEUR DU POINT
LARGO PUNTADA
STITCH WIDTH
LARGEUR DU POINT
ANCHO PUNTADA
mm 0 0.5 1.0 1.5 2.0 2.5 3.0 3.5 4.0 4.5 5.0 5.5 6.0
0
0.3
0.5
0.8
1.0
1.3
1.5
1.8
2.0
2.5
3.0
RÉGLAGES :Pied presseur - Pied universel
:Réglage de la tension du
l supérieur - 5
Les cases gris clair indique toutes les
options de préférences personnelles
disponibles pouvant être réglées
manuellement.
Une case gris foncé indique la valeur
automatique / par défaut réglée
automatiquement lors de la sélection du
motif.
Pour le motif zigzag, la longueur du point est
de 2 mm et la largeur du point est de 5 mm.
RÉGLAGE DE LA LARGEUR ET DE LA LONGUEUR DU POINT
AJUSTES :Pie prensatelas - Pie universal
:Control tensión hilo - 5
La casilla gris clara indica todas las opciones
de preferencia personal disponibles para ajustar
manualmente.
La casilla gris oscuro indica el valor automático/
por defecto ajustado automáticamente cuando
se selecciona el patrón.
Para el patrón de zigzag el largo de puntada es
2 mm y el ancho de puntada es 5 mm.
AJUSTE DEL ANCHO Y LARGO DE
PUNTADA
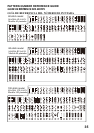
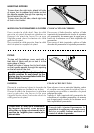
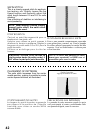
ZIGZAG STITCHING
POINT ZIGZAG
PUNTADA ZIG-ZAG
Le l supérieur peut paraître sur l’envers,
selon le l, le tissu et la vitesse de couture,
mais le fil de la canette ne doit jamais
paraître sur l’endroit.
Si le l de la canette tire vers le haut ou
si des fronces se produisent, réduisez
légèrement la tension à l’aide de la
commande de réglage de la tension du
l supérieure.
The top thread may appear on the bottom
depending on the thread, fabric, type of
stitch and sewing speed, but the bobbin
thread must never appear on the top of the
fabric.
If bobbin thread is pulling to the top or you
are experiencing puckering, slightly reduce
the tension with the thread tension control.
El hilo superior puede aparecer en la parte
inferior, según el hilo, tejido, tipo de puntada y
velocidad de costura, pero el hilo de la bobina
nunca deberá aparecer en la parte superior del
tejido.
Si el hilo de la bobina está tirando hacia arriba
o si tiene problemas con la formación de
arrugas, reduzca ligeramente la tensión con el
control de tensión de hilo.
100 stitch model :
80 stitch model :
60 stitch model :
03
03
03