


18
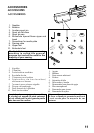
②
③
①
④
⑤
1
2
3
5
4
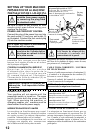
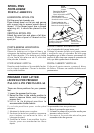
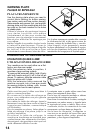
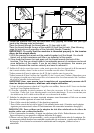
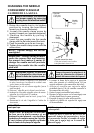
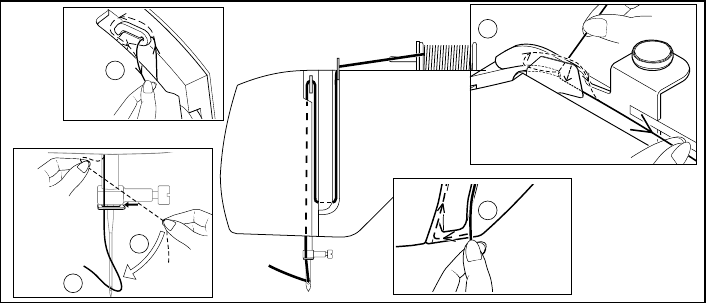
*Pass the thread through the thread take-up (3) from right to left.
*Pass the thread through the eye of the needle (5) from front to back. (See following
page for instructions on operation of the Automatic Needle Threader.)
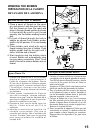
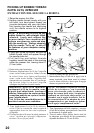
1.) With the presser foot raised and the needle threaded, pull the thread. You should
detect only a slight resistance and little or no deection of the needle.
2.) Now lower the presser foot and again pull the thread towards the back of the
machine. This time you should detect a considerable amount of resistance and much
more deection of the needle. If you do not detect the resistance, this means you
have not threaded the machine correctly and need to rethread it.
C.Thread the machine with your left hand while rmly gripping the thread with your right
hand in the following order as illustrated.
IMPORTANT: To verify that the machine is threaded properly in the tension
discs, do this simple check:
C. Enlez le l de la machine avec votre main gauche tout en tenant le l fermement
de la main droite, dans l’ordre suivant comme montré dans l’illustration.
* Faites passer le l par le releveur de l (3) de la droite vers la gauche.
* Faites passer le l par l’orice de l’aiguille (5) de l’avant vers l’arrière. (Reportez-vous
à la page suivante pour les instructions concernant le fonctionnement de l’enleur
de chas d’aiguille automatique.)
1.) Avec le pied presseur relevé et l’aiguille non-enlée, tirez sur le l. Vous ne devriez
sentir qu’une légère résistance.
2.) Ensuite, abaisser le pied presseur et tirez de nouveau le fil vers l’arrière de la
machine. Cette fois, vous devriez sentir une forte résistance. Si vous ne sentez pas
de résistance, le l a été mal enlé et vous devez le ré-enler.
IMPORTANT: pour vous assurer que la machine est correctement pourvue de fil
dans les disques de tensions, effectuez cette simple vérication.
C. Enhebre la máquina con su mano izquierda mientras toma rmemente el hilo con su mano
derecha en el orden siguiente tal como está ilustrado.
* Pase el hilo a través del tirahilos (3) de derecha a izquierda.
* Pase el hilo a través del ojo de la aguja (5) de adelante hacia atrás. (Continúe con la página
siguiente por instrucciones sobre el funcionamiento del ensartador automático de agujas.)
IMPORTANTE: Para vericar que la máquina ha sido bien enhebrada en los discos de
tensión, realice esta vericación sencilla:
1.)Con el prensatelas levantado y la aguja sin enhebrar, jalar el hilo. Deberá detectar solo una
ligera resistencia y una pequeña o ninguna deexión de la aguja.
2.)Ahora vuelva a bajar el pie prensatelas y vuelva a tirar del hilo hacia atrás de la máquina. En
ese momento deberá detectar una cantidad considerable de resistencia y mucha más deexión
de la aguja. Si no detecta la resistencia ha enhebrado mal la máquina y deberá volver a
enhebrarla.
(C)