


7
High Speed Straight Lockstitch Sewing Machine | Instruction Manual and Parts List
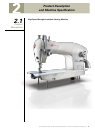
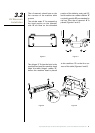
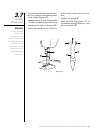
3.3
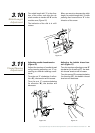
Belt Cover and
Bobbin Winder
Installation
For safety, the
belt cover should
be installed.
The left and
right parts of the
bobbin winder
should be parallel
to the plate
belt slot on the
machine table.
Caution
Figure 6
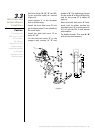
Drill four holes ‘A’, ‘B’, ‘C’ and ‘D’,
in the machine table for screws
(Figure 6).
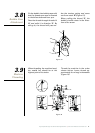
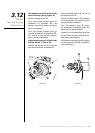
Insert support ‘1’ in the threaded
hole in the housing.
Install the front belt cover ‘3’ and
get the hand wheel in the middle of
the cover hole.
Install the back belt cover ‘2’ at
holes ‘C’, ‘D’.
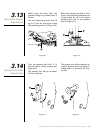
Fix the front belt cover ‘3’ on the
support with screws ‘4’, ‘5’ and
washers ‘6’. The tightening torque
for the screw ‘4’ is about 30 kgf×cm,
and for the screw ‘5’ is about 25
kgf×cm.
Move the back belt cover ‘2’ back-
ward, until its rubber touches the
front belt cover ‘3’, move it again for
0.5~1.0 mm and fix it with screws
and washers.
Fix bobbin winder ‘7’ at hole A’, ‘B’
with screws and washers.