


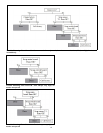
1 6
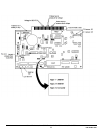
Basic tools required for troubleshooting - Multi Volt/Ohm Meter, standard and phillips screw drivers, standard jewelers
screw driver (fan speed adjustments on main control board).
No power - Power is provided by both AC and DC supplies. There are two replaceable fuses located near the power
connections. They are identified as Main (1 amp) and Ignitor (5 amp). If AC power is present to the main control system a
LED will be lit on the OFF button. If DC power is present a GREEN LED will be lit on the control panel.
Quick Testing -
1) Check AC power with volt meter at wall socket - 115VAC.
2) Check DC power at battery - 12VDC.
3) Remove fuses and check continuity with OHM meter. Blown fuses can be cause by voltage spikes (lightning,
power company). If fuse is found blown, replace only once and retest. If the fuse blows again further
troubleshooting is required before further fuse replacement.
Start up:
No fuel - Fuel located in the hopper is feed by a auger from the hopper bottom up to the shoot which directs the pellets into
the burn pot. The feed motor is controlled by the main control system and on models EF3801B, 5001B, and 5001U-B a
hopper safety switch (EF4001-B auger can not be accessed from the hopper door). The switch will disable the feed system
if the hopper lid is open. The switch is located on the upper right hopper vertical panel and is accessed through a small
panel. Fuels is only feed in Low to High operating modes and requires “priming” auger. If hopper is out of fuel, cycle from
OFF to LOW several times to allow pellets to feed into burn pot.
Quick Testing -
1) Confirm hopper lid is sitting on the switch arm and the arm is closing. With hopper lid open, push the switch arm down
and listen for click noting switch closure. With heater cold, and lid open, push switch arm down, push Low and the feed
motor should start to turn.
2) Confirm feed motor is not jammed by emptying hopper and verifying a foreign object has not be caught. Remove top
cover from feed tube from inside hopper if there is any question. If the feed motor is mechanically jammed, the control
system has a built in circuit breaker. The breaker will require a reset by cycling from OFF to LOW. Do not recycle more
than three times so the circuit does not become damaged by overheating.
3) Pellets Jammed in feed shoot (above burn pot). Remove all jammed pellets and clean shoot with scraper.
Ignitor does not heat up - The ignitor has a separate 120VAC circuit which includes a fuse, relay, and ignitor. This circuit is
activated by the main control board via a 12VDC wire harness lead. W hen the main control call for start the 12VDC circuit
is closed sending 12VDC to the relay. As the relay closes, the 120VAC circuit is completed and the ignitor begins to heat.
As noted in prior section, if 120VAC power is not available the heater will still start the fan and feed if 12VDC is connected
allowing a manual start with starter and match light.
Quick Testing -
1) Inoperative ignitor most likely have a blown fuse. Remove the 5 amp ignitor fuse and test with OHM meter.
Replace if blown. As noted before if fuse blows again then further testing is required.
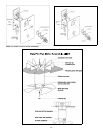
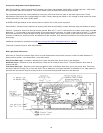
2) Testing ignitor requires access to the relay located near the main board assembly. Access is through the lower
right pedestal for the 3801/5001, junction box on the 4001 insert, and lower right cabinet for the 5001U. Remove
the power to the unit. Unplug the ignitor lead from the relay and the neutral circuit. Using the OHM meter check for
continuity between the two leads. If the circuit is open the ignitor has failed. If the circuit is complete check one
lead and then ground the other lead to the ignitor base. If circuit is complete ignitor has failed. A grounded circuit
will cause the fuse to blow.
3) If ignitor check out, remove the harness leads to the relay and using the volt meter set to 20VDC, confirm 12VDC
when the power is reapplied a run button is pushed. If 12VDC is found then the relay has failed.
Heater starts then burns out - The start up is controlled by the control system and best results are from a cold start. If a
warm heater is immediately restarted it may not be able to confirm the required temperature increase as the heater
temperature is already warm and the temperature is actually falling during the initial start up. Allow the heater to cool and
shut down before restarting.
Trim settings - W ill not change the first portion of the start up however will effect the initial run mode. If the trim is fully
counter clockwise (Lowest) the heater may run low on fuel, most likely if the operating conditions are warm. High or Max