


Questions? Visit Shop-Vac at www.shopvac.com or call (570) 326-3557. • Ante cualquier consulta, visite Shop-Vac en www.shopvac.com o llame al (570) 326-3557.
8
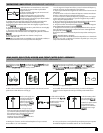
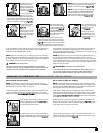
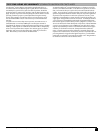
48. Remove inlet deflector from the deflector guide
sliding in an upward motion.
NNOOTTEE::
Hose must be
removed before inlet deflector can be taken out. Be
sure the opening of the inlet deflector is facing the
top of the tank
((FFiigguurree 3333))
, misting may occur if inlet
deflector is not inserted properly.
48. Retire el deflector de entrada de la guía del deflector deslizando con un
movimiento hacia arriba.
NNOOTTAA
: Debe retirar la manguera antes de poder sacar
el deflector de entrada. Asegúrese de que la abertura del deflector de entrada
esté mirando hacia la parte superior del depósito
((FFiigguurraa 3333))
. Puede ocurrir una
condensación si el deflector de entrada no está insertado adecuadamente.
49. La condensación en el aire de emisión puede ocurrir si el filtro se satura
durante la aspiración de líquidos. Si hay condensación, retire y deje secar el
filtro, reemplácelo con otro filtro seco para eliminar la condensación y el
escurrimiento de líquido alrededor de la tapa. Apague inmediatamente la
unidad después de terminar un trabajo de aspiración de líquidos o cuando el
depósito esté lleno y listo para ser vaciado. Eleve la manguera para drenar
cualquier exceso de líquido hacia el depósito. El interior del depósito debe
limpiarse periódicamente.
49. Misting in exhaust air may occur if the filter becomes saturated during wet
pick-up. If misting occurs, remove filter and allow to dry or, replace with
another dry filter to eliminate the misting and possible dripping of liquid
around the lid. Turn the unit off immediately upon completing a wet pick-up
job or when tank is full and ready to be emptied. Raise the hose to drain any
excess liquid into the tank. The interior of the tank should be periodically
cleaned.
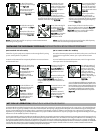
50. The foam sleeve should be cleaned periodically as described in the fol-
lowing steps:
a. Always disconnect the plug from the wall receptacle before removing the
tank cover. Place tank cover in an upside down position. Remove foam
sleeve by sliding it up and off the lid cage.
b. Shake excess dust off foam sleeve with a rapid up and down movement.
c. Hold foam sleeve under running water for a minute or two, rinsing from the
inside. A water wash is not always required, depending on the condition of
the foam sleeve.
d. Gently wring out excess water, blot foam sleeve with a clean towel, and
allow to dry. The foam sleeve is now ready to be reinstalled on the lid
cage.
NNOOTTEE::
Wet pick-up accessories should be washed periodically, especially
after picking up wet, sticky kitchen accidents. This can be accomplished with a
warm solution of soap and water.
50. El manguito de espuma debe limpiarse periódicamente como se describe
en los siguientes pasos:
a. Desconecte siempre el enchufe del tomacorriente de pared antes de reti-
rar la cubierta del depósito. Coloque la cubierta del depósito en una posi-
ción invertida. Retire el manguito de espuma deslizándolo hacia arriba y
afuera del alojamiento de la tapa.
b. Sacuda el exceso de polvo del manguito con un movimiento rápido hacia
arriba y abajo.
c. Sostenga el manguito bajo el agua corriente enjuagándolo desde el interi-
or. No siempre se requiere un lavado con agua, dependiendo de la condi-
ción del manguito.
d. Elimine el exceso de agua, seque el manguito con una toalla limpia y deje
que se seque. El manguito de espuma está listo para ser reinstalado en el
alojamiento de la tapa
NNOOTTAA::
Los accesorios utilizados para la aspiración de líquidos deben
lavarse periódicamente, especialmente después de aspirar líquidos, y de acci-
dentes en la cocina con sustancias pegajosas. Esto puede llevarse a cabo con
una solución tibia ce agua y jabón.
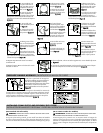
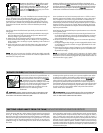
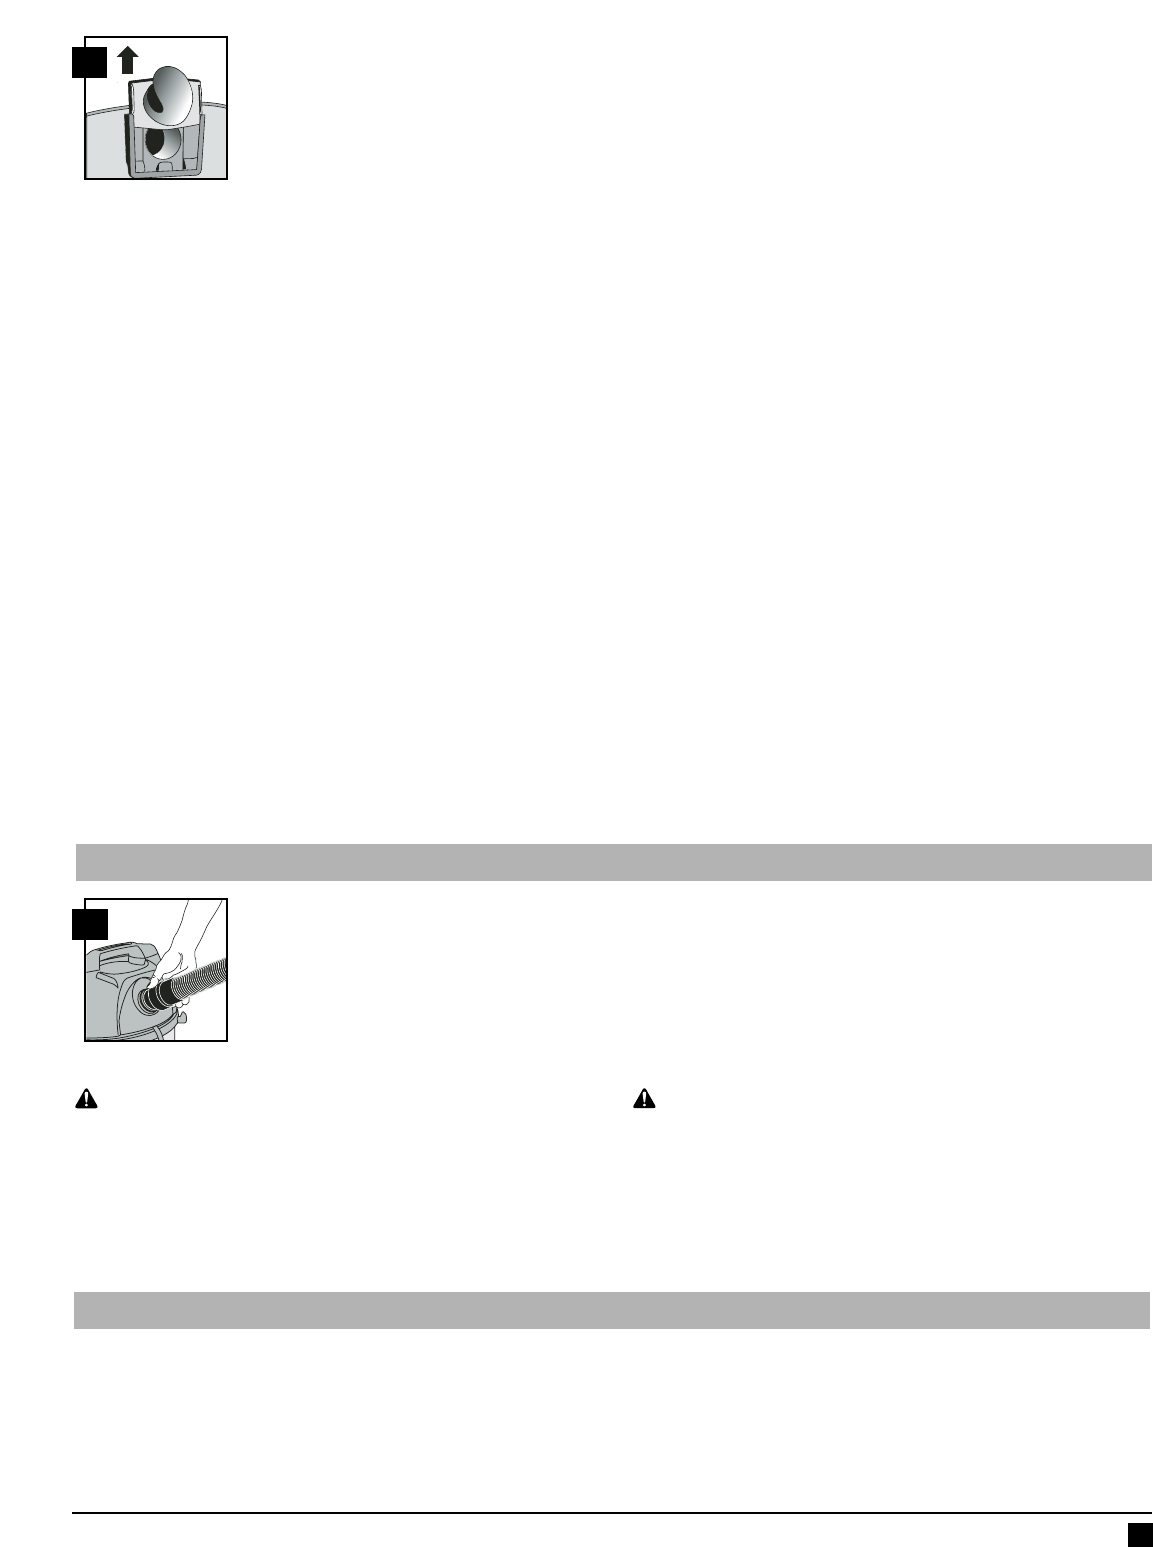
51. This vacuum can be used as a powerful blower. To
use your unit as a blower unscrew blower port cover
located on the backside of the motor housing
((FFiigguurree
3344))
. The blower port cover is equipped with a
retaining strap to prevent loss of the port cover while
blower is in use. Insert hose end with locking-nut into
blower port on rear of unit and tighten. Caution
should be used when using as a blower due to the
powerful force of air when using certain
attachments.
34
51. Esta aspiradora puede ser usada como un potente soplador. Para utilizar
su unidad como soplador, desatornille la cubierta del orificio del soplador
localizada en la parte posterior del alojamiento del motor
((FFiigguurraa 3344))
. La
cubierta del orificio del soplador está equipada con una cinta de sujeción
para prevenir la pérdida de la cubierta del orificio mientras el soplador se
está utilizando. Inserte el extremo de la manguera con la tuerca de seguridad
en el orificio del soplador del depósito y apriete. Debe tener cuidado cuan-
do utilice el aparato como soplador debido a la potente fuerza del aire
cuando utiliza ciertos aditamentos.
BLOWER FEATURE/FUNCIÓN DE SOPLADOR
WARNING:
ALWAYS WEAR EYE PROTECTION TO PREVENT ROCKS
OR DEBRIS FROM BEING BLOWN OR RICOCHETING INTO THE EYES OR
FACE WHICH CAN RESULT IN SERIOUS INJURY.
ADVERTENCIA:
UTILICE SIEMPRE PROTECCIÓN OCULAR PARA PRE-
VENIR EL INGRESO DE PIEDRECILLAS O RESIDUOS EN LOS OJOS O LA
CARA, YA QUE PODRÍA SUFRIR LESIONES GRAVES.
EMPTYING LIQUID WASTE FROM THE TANK/VACIADO DEL DESECHO LÍQUIDO DEL DEPÓSITO
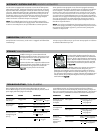
52. Your Shop-Vac Wet/Dry can be emptied of liquid waste by removing the
drain cap. To empty, turn unit off and remove plug from the wall receptacle.
Remove the drain cap and deposit the liquid waste contents in a suitable drain.
After the tank is empty, return the drain cap to its original position. To continue
use, plug the cord into the wall receptacle and turn the unit on. Use side carry
handles for lifting vac when draining tank into drains that are located above
floor level.
52. Su aspiradora para líquidos y sólidos Shop-Vac puede vaciarse de dese-
chos líquidos retirando la tapa de drenaje. Para vaciar, apague la unidad y
retire el enchufe del tomacorriente de pared. Retire la tapa de drenaje y
deposite el contenido de desperdicio líquido en un drenaje adecuado. Una vez
que haya vaciado el depósito, regrese la tapa de drenaje a su posición origi-
nal. Para continuar usando el aparato, enchufe el cable en el tomacorriente y
encienda la unidad. Utilice las manijas de transporte laterales para levantar la
aspiradora cuando drene el depósito en drenajes que estén localizados por
encima del nivel del piso.
33