


Shop Fox
®
Fence -13-
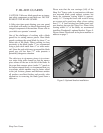
Step 10.
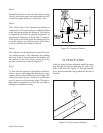
Increase the clamping force by unscrewing the
longer yoke (#22) half a turn and retest. If more
adjustment is required, screw the shorter yoke
(#10) in half a turn. If further adjustment is
required, continue to work back and forth between
the two yokes so that both are adjusted equally.
Step 11.
To reduce the clamping force, screw the longer
yoke in or the shorter yoke out.
Step 12.
Reinstall all pivot pins and cotter pins and test the
clamping force of the entire unit. Locking lever
pressure should not exceed 20 pounds. The fence
should be able to withstand approximately 50
pounds of lateral force.
CAUTION: Through repeated use and wear, re-
adjustment of the front and rear clamps and
handle throw may be necessary for safe operation
and maximum performance.
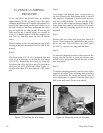
Step 8.
Push down the locking lever and test the grip of
the rear clamp by pushing from side to side on the
back end of the fence. If the clamp holds securely
under a lateral force of 25 pounds, the rear clamp
requires no further adjustment. If the rear clamp
slips under 25 pounds of lateral force, adjustment
will be necessary.
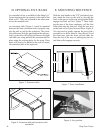
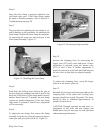
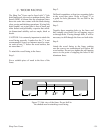
Step 9.
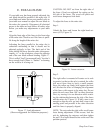
To adjust the rear clamp, first remove the clamp
assembly from the two yokes by removing the two
cotter pins and pivot pins (#8 & 16). Figure 16.
Step 6.
Once the front clamp is properly adjusted, rein
-
stall both cotter pins. If the front clamp cannot
be made to function properly, refer to Section V,
Troubleshooting on page 20.
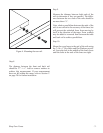
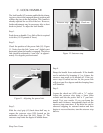
Step 7.
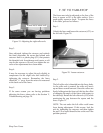
The procedure for adjusting the rear clamp is vir-
tually identical to the procedure for adjusting the
front clamp. Disable the front clamp by temporar-
ily removing the cotter pin and pivot pin in the
front clamp assembly. Figure 15.
Figure 15. Disabling the front clamp.
Figure 16. Removing clamp assembly.
Remove
Remove
Remove