


Shop Fox
®
Fence -11-
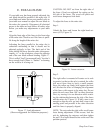
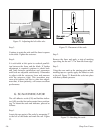
Figure 11. Adjusting the power link.
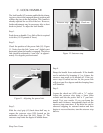
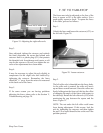
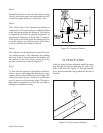
Figure 12. Setscrew stop.
Step 4.
Bump the handle from underneath. If the handle
can be unlocked by bumping it 3 or 4 times, the
setscrew stop needs to be backed off. If the set-
screw stop is backed out too far, the power link
will pivot past five degrees and the clamping force
will diminish.
Step 5.
Loosen the check nut (#29) with a
7
⁄16" socket.
Adjust the setscrew stop using a 3mm Allen
wrench until the the power link is 5˚ past hori-
zontal. Test your results. If you can bump the
handle and it releases, incrementally back out the
setscrew stop some more. If the draw bar can be
observed stopping its outward motion and then
begins to reverse direction, turn the setscrew stop
back in.
Step 3.
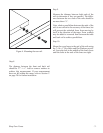
Slide the vinyl grip (#1) back about half way to
expose the setscrew stop (#28) located on the
underside of the draw bar (#6). Figure 12. The
setscrew stop limits the degree of handle throw.
Setscrew stop
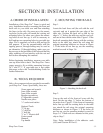
Power link
Check nut
5˚
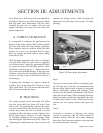
C. LOCK HANDLE
The lock handle (#2) actuates and holds the clamp-
ing jaws when in the engaged (down) position and
releases the jaws in the up position. This handle is
already adjusted for use out of the box. However,
further adjustment may be necessary after a short
break-in period. To adjust the lock handle:
Step 1.
Push down on handle. Very little effort is required
to do this (15-20 pounds of force).
Step 2.
Check the position of the power link (#5). Figure
11. Notice how the link “cams over” slightly past
horizontal when the handle is engaged. The power
link should be adjusted to “cam over” at approxi-
mately five degrees past horizontal.