


-10- Shop Fox
®
Fence
SECTION III: ADJUSTMENTS
Your Shop Fox
®
Fence has been pre-adjusted at
the factory. However, it will be necessary to check
and fine tune each adjustment with the fence
installed on your saw. A quality steel rule and
square will help you bring your new fence into
perfect alignment.
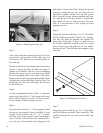
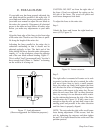
A. TABLE CLEARANCE
It is important to minimize the gap between the
bottom of the fence and the table so thin material
will not slide under the fence during operation.
This clearance must be uniform along the table
surface. It is also very important that the fence
does not contact the table surface when sliding
from side to side.
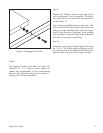
With the fence mounted on the rails, try sliding it
over the table. Make sure the fence is supported
by all three rollers. Gauge the gap under the fence
at various locations over the table surface. There
should be a uniform gap of
1
⁄16" between the bot-
tom of the fence and the tabletop. If the gap is not
uniform, loosen the rail mounting bolts and raise
or lower one end of one or both rails to achieve a
uniform gap.
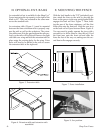
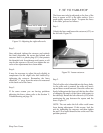
If ripping thin laminates or veneers, clamp an
auxiliary fence to the Shop Fox
®
Fence so it rests
right on the table. This will ensure that thin mate-
rial will not slip under the fence.
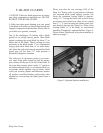
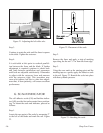
B. TRACKING
The spring tension on the rear roller will affect
the ease with which the fence will travel from
side to side. Too much spring tension will restrict
free movement of the fence on the rails. Too little
tension may allow the fence to derail if moved
abruptly or allow the fence to skew slightly when
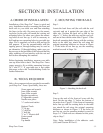
being locked down. Tension is easily adjusted
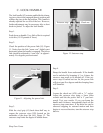
by reaching underneath the rear carriage (#44)
and turning the adjustment nut (#48). Figure 10.
Tightening the adjustment nut onto the stud will
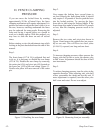
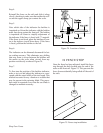
Step 1.
Test ease of movement relative to tracking qual-
ity. The best way to do this is to experiment with
the rear roller tension until a setting is found that
allows comfortable motion and tracking. Grab
the fence by the handle and abruptly slide it back
and forth several times. When changing direction,
both front rollers should stay engaged to the rails.
If either roller tends to move away from the rail,
increase the rear spring tension and repeat the
test.
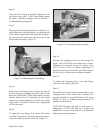
Step 2.
Continue to increase or decrease rear spring
tension as necessary until all rollers remain in
constant contact with the rails when changing
directions. Don't increase tension to the point that
movement becomes restricted.
Figure 10. Rear spring adjustment.
Adjustment nut
increase the spring tension while loosening the
adjustment nut will reduce the tension. To adjust
tracking: