


WARNING: Avoid tipping the vacuum or
setting it on furniture, fringed area rugs or
carpeted stairs while you are using the
hose with the attachments. When the
vacuum is turned on, the agitator will
continue to rotate until you put the carpet-
to-floor selector to the “Floor” position.
Avoid leaving the vacuum in one place for
an extended period of time, particularly
on thick carpet.
OPERATING INSTRUCTIONS
CAUTION: Do not pull the vacuum
cleaner around the room by the hose as it
could tip over and cause damage. When
using the attachments, Do not
over
extend the hose length when reaching.
Trying to reach beyond the hose reach
could cause the vacuum to tip over.
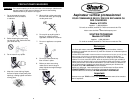
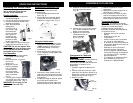
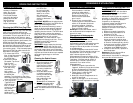
Crevice Tool
For radiators, crevices, corners,
baseboards and between cushions.
Upholstery Brush
The upholstery brush is used
for the furniture. The unique
surface makes it an excellent
tool for removing unwanted pet hair.
Note: This tool is not a grooming tool and
should not be used on animals.
CAUTION: Do not use upholstery brush
on delicate or woven fabrics that may
snag on upholstery brush. Do not
use it
on wooden floors as this accessory might
cause mild scratching.
Dusting Brush
The dusting brush is used for
the furniture
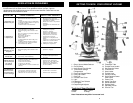
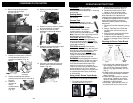
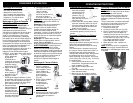
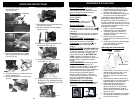
Using the Air Driven Turbo Brush
Your Turbo Brush is located din the front of
your vacuum in its storage compartment.
1. Pull down turbo brush storage
compartment door. (Fig. 6)
WARNING: To reduce the risk of electric
shock, the power cord must be
disconnected before attaching or removing
accessories.
2. Remove the air driven turbo brush
from the front of the unit. (Fig. 7)
3. Connect the turbo brush to hose
handle or to the telescopic tube.
The efficiency of your air driven turbo
brush depends on the bristle brush
rotating at high speed. Strong air suction
is needed to accomplish this. In order to
ensure that maximum air suction is
maintained, please read the following
instructions:
1. Empty the Dust Cup frequently during
use.
2. Always “TapClean” the HEPA dust
cup filter each time the dust cup is
emptied.
3. Ensure that the rotating bristle brush
is kept free of hair and string.
4. Inspect the turbine regularly to ensure
that the air passage is free of dirt and
debris.
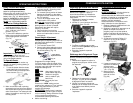
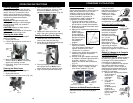
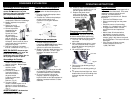
Cleaning Air Driven Turbo Brush
Hand Held Air Driven
Turbo Brush
Fig. 6
Fig. 7
1. Pull locking latch upwards then tilt the
door housing of the brush upwards.
(Fig. 8) The door housing is hinged
and will tilt up approximately 45° only.
(Fig. 9)
2. Inspect turbine wheel and air passage
for debris and/or blockage. Remove
debris if present.
3. Inspect the rotating brush for built-up
hair or string. If present, remove by
carefully cutting with scissors. Avoid
damaging or cutting bristles.
4. Once clean, press the door cover of
the turbo brush until it clicks to lock.
Fig. 8
Fig. 9
Tilt
Upwards
Locking
Latch
5
Turbine
Wheel
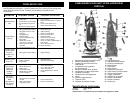
CONSIGNES D’UTILISATION
44
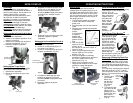
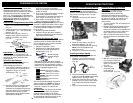
8. Retirez doucement tout détritus
pouvant se trouver dans la zone de la
courroie.
9. Retirez la
courroie de
l’arbre
d’entraînement
du moteur.
(Fig. 44)
Fig. 44
Fig. 42
7. Retirez le couvercle de la courroie
du côté droit afin de couvrir la
courroie et le batteur. (Fig. 42
et 43)
Couvercle de
la courroie
Fig. 43
11. Retirez la courroie usée ou cassée
de la transmission du moteur.
12. Placez la nouvelle courroie
pardessus la brosse du batteur.
(Fig. 46)
10. Retirez la brosse du batteur.
(Fig. 45)
Fig. 45
Fig. 46
13. Replacez la brosse du batteur dans
la buse motorisée. (Fig. 47)
Fig. 47
14. Enroulez la nouvelle courroie par-
dessus l’arbre d’entraînement du
moteur. (Fig. 48)
Fig. 48
6. Retirez la pince de retenue du
couvercle de la courroie.
(Fig. 40, Fig. 41)
Fig. 40
Pince de
retenue
Fig. 41
Pince de retenue