


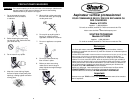
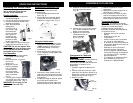
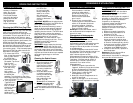
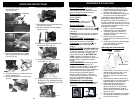

Handle Assembly
1. Carefully unpack all components,
set aside packaging.
2. Lift vacuum body to upright position.
3. Remove the screws (2) that come
attached to the body.
4. Open the turbo brush
storage door.
From the front of
the vacuum, align
the handle with
groove and slide
onto vacuum. If
necessary, use
thumb and finger
pressure to slide
handle into position.
5. Once handle is in place, secure the
handle with the screws (2). (Fig. 1)
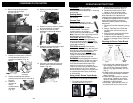
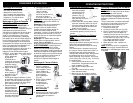
Cord Assembly
1. Make sure that the quick release
cord holder is in the upright
position.
2. Remove the wire
tie from the
power cord.
3. Wrap the cord into
place by wrapping
it in a clockwise
direction around
the quick release
cord holder and the
lower cord holder.
(Fig. 2)
4. Turn the quick release
cord holder to the left or right to
unwrap the power cord. (Fig. 2)
WARNING: Do not plug in if the
On/Off switch is in the "On"
position.
OPERATING INSTRUCTIONS
Assembling Your Vacuum Cleaner
Note: Do not plug the power cord
into an electrical outlet until the
vacuum is fully assembled.
CAUTION:
4
Do not over tighten. Over
tightening could strip the screw holes.
Do not operate the vacuum without
the handle screws in place.
Fig. 1
Fig. 2
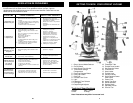
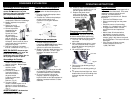
Using the Attachments
1. Place vacuum in its upright position.
Make sure that the vacuum cleaner
is NOT plugged into the electrical
outlet when adding or removing
accessories.
2. Press carpet-to-floor selector to the
“Floor” selection to stop agitator from
rotating. (Fig. 5 )
3. Remove the hose handle from the
side of the unit and push the desired
attachment firmly onto the end of the
hose handle.
4. If additional length is required, attach
the flexible hose handle to the
telescopic tube and then attach the
desired accessory to the other end.
Fig. 5
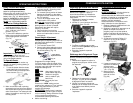
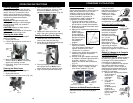
Quick Release
Floor
Plastic
Button
Fig. 4
Fig. 3
Attaching the Telescopic Tube
to the Hose
To attach the flexible hose to the
telescopic tube:
1. Push the telescopic tube into the
hose. (Fig. 3)
2. Push forward on the plastic button
and pull the inner tube outward to
extend for a longer reach. (Fig. 4)
CONSIGNES D’UTILISATION
45
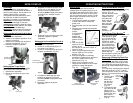
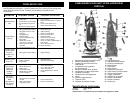
Changement de l’ampoule
Électrique
AVERTISSEMENT: Afin de réduire les
risques d’électrocution, le cordon
d’alimentation doit être débranché avant
de procéder à l’entretien ou au
dépannage.
1. Éteignez l’appareil et débranchez-
le.
2. Insérez la tête d’un tournevis à tête
plate dans une des deux fentes sur le
dessus de la lentille du phare et tirez
doucement vers le bas. (Fig.51)
3. Retirez la lentille.
Fentes
de la lentille
Thermostat du Moteur
4. Retirez l’ampoule en la tirant
doucement.
5. Replacez la nouvelle ampoule en la
poussant vers l’intérieur.
6. Pour remplacer la lentille du phare,
insérez les onglets inférieurs de la
lentille dans les fentes de retenue et
faites claquer le dessus pour la fixer.
Important: Cet appareil est équipé
d’un thermostat de protection du moteur.
Si, pour une raison quelconque,
l’aspirateur devait surchauffer, le
thermostat l’éteindra automatiquement.
Si ceci devait arriver :
• Appuyez une fois sur le bouton
On/Off.
• Débranchez la fiche de
l’alimentation.
• Vérifiez la source de la surchauffe
(ex.: boyau ou filtre obstrués).
• Si le boyau ou le filtre sont obstrués,
retirez toute obstruction du boyau et
remplacez le filtre.
• Attendez au moins 45 minutes
avant de réutiliser l’aspirateur.
• Une fois l’appareil refroidi pendant
45 minutes, branchez-le et appuyez
sur le bouton On/Off. L’aspirateur
devrait redémarrer.
• Si l’aspirateur ne démarre toujours
pas, contactez le service à la
clientèle au 1 (866) 826-6941.
Fig. 51
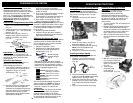
15. Replacez le couvercle de la courroie,
suivi de la pince de retenue.
(Fig. 49)
16. Vérifiez que la courroie est centrée
sur la brosse du batteur et que le
batteur tourne librement.
17. Replacez le couvercle de
l’électrobrosse sur sa
base et remettez
les vis. (Fig. 50)
Fig. 49
Fig. 50