


12 TOLL FREE: 1-800-798-7398 13www.sharkclean.com
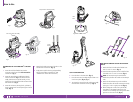
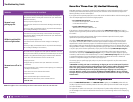
STORE YOUR VACUUM SAFELY
1 Store the dusting brush, upholstery brush, the
crevice tool or the power brush on the mounts on
the removable tool caddy. (fig. 20)
2 Wrap the flexible hose around the base of the
vacuum and hook the end of the flexible hose into
the hose dock. (fig. 21) To release the hose, press
the Hose Storage button.
3 Wrap the attached cord strap around the power
cord when storing.
4 Store your vacuum cleaner with the rest of the
accessories safely in a cool dry area where they
will not be a hazard, will not get damaged and will
not cause damage to anyone or anything.
NOTE: Empty dust cup after cleaning and prior
to storing. (See “Maintenance” section for
instructions.)
Storing
Your Shark
®
Lift-Around™ Canister Vac is
equipped with a protective Motor Thermostat. If the
motor should overheat, the thermostat shuts off the
power.
To reset the Motor Thermostat:
Press the Power Button to turn the vacuum off.
Unplug the vacuum.
Check for clogged hose or filter; unclog hose and
replace filter. Refer to Checking for Blockages.
Wait 45 minutes for vacuum to cool; then plug in the
vacuum.
Press the Power Button to restart the vacuum.
Note: If vacuum still does not start, contact Customer
Service at: 1-800-798-7398.
Resetting the Motor Thermostat
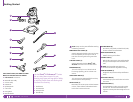
Ordering Replacement Parts
To order additional parts and accessories, go to
www.sharkclean.com or call 1-800-798-7398.
PART PART NO.
Pre-Motor Filters XFF318
HEPA Filter XHF318
Telescopic Tube 1057FT
Upholstery Brush 1061FT
Crevice Tool 1062FT
Dusting Brush 1063FT
Power Brush 1064FT
Floor Kit Handle XKH320
Canister Caddy XCAD320
Bare floor Nozzle XSN320
Fig. 20
Fig. 21
Checking for Blockages
Blockages may cause your vacuum to overheat and
shut down. To prevent this from happening, check
potential blockage areas after heavy use or if you
detect a loss of suction or poor cleaning performance.
1 DUST CUP
Dust Cup may be full. Empty Dust Cup.
2 FILTERS (PRE-MOTOR AND POST MOTOR)
Ensure that both the Pre Motor Filters and the Post
Motor HEPA filter are clean.
3 ACCESSORIES
Check intake openings:
• PowerBrush
• CreviceTool
• UpholsteryBrush
• DustingBrush
• FlexibleHose
• FloorKitHandle
• BareoorNozzle
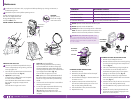
CLEANING THE POWER BRUSH
•
Turn the Power Brush over, slide the locking latch
forward and tilt the cover upward to remove.
(fig. 18)
•
Inspect the rotating bristle brush, turbine wheel
and air passage.
•
Remove any blockage or debris and carefully,
without damaging the bristles or belt, cut any
build-up of hair or string wrapped around the
rotating bristle brush with scissors.
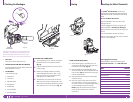
•
To reassemble, first insert the tabs on the front
edge of the cover into the matching holes in the
top half of the Power Brush and tilt the cover back
down pressing until it clicks into place. (fig. 19)
Locking
Latch
Rotating
Bristle Brush
Turbine
Wheel
Fig. 18
Fig. 19