


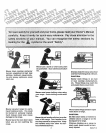

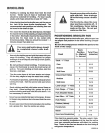
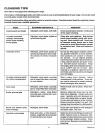

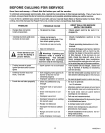


BEFORE CALL|NG FOR SERVmCE
POSSIBLE CAUSE DON'T CALL FOR SERVIC5
UNTnL YOU CHECK
• - Improper rack position
PROBLEM
Foods do not brotl
properly
Oven smokes
Oven light or work
light does not work
(if equipped)
Continuous-Cleaning
oven finish looks soiled
, Oven preheated
• Improper utensil used
• Improper broiling time
• Oven dooropen
• Dirty oven
• Broiler pan full of grease left
in oven
• Light switch in off position
- Light bulb burned out
• Heavy spilloverswere not
wiped up promptly
• Check broil pan placement; see Broiling
section.
• Do not preheat when broiling.
• Use broiler pan and grid supplied with
range.
• Check broiling chart in broiling section.
• Close door.
• Check for heavy spillover.
• Clean pan and grid after each use.
• Be sure that sump grease well is to the
front of the range when broiling.
Check switch setting°
Check or replace light bulb; see cleaning
and care instructions.
See Continuous-Cleaning Oven lnforma
tion in cleaning and care sections The
continuous-cleaning oven finish wilt not
keep your oven spotless; only presentably
clean.
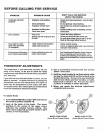
THERMOSTAT ADJUSTMENTS
The temperature in your new oven has been set cor-
rectly at the factory, so be sure to follow the recipe
temperatures and times the first few times you bake in
your new oven.
ff you think the oven should be hotter or cooler, you can
adjust it yourself, To decide how much to change the
temperature, set the oven temperature 25°F higher or
lower than the temperature in your recipe, then bake.
The results of this "test" should give you an Idea of how
much the temperature should be changed,
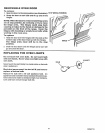
3. Use a screwdriver to gooser= the two screws
about 1 turn each.
4. Hold the knob handle (A on i_Uustration) while
turning the knob skirt (B on illustration) in the
desired direction• As you turn, you should be
able to hear clicks and feel notches or teeth.
Each click or notch is 10 °. You can turn up to
5 clicks or notches in either direction.
5, When you reach the desired adjustment,
retighten both screws.
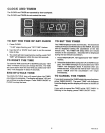
To Adjust Knob:
t. Turn OVEN CONTROL knob to OFF and remove
the knob by pulling straight off.
2. Look at the back of the knob. The arrow
pointing to the center of the upper screw
indicates the original factory setting. The
knob can be adjusted up to 50°F hotter or 50°F
cooler, in 10 ° increments.
MAKES OVEN COOLER MAKES OVEN HOTTER
(Screw Moved Toward Cooler) (Screw Moved Toward Hotter)
17 NGSER14