


4
4. Disconnect electrical source to motor, following lock-out/tag-out procedure.
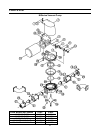
5. Remove the six (6) 5/16" fasteners around the circumference of the pump top.
6. Carefully remove the pump top from the pump body.
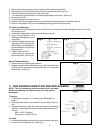
7. Turn the pump top upside down to expose the diaphragm and rod bolt. (See Fig. 3)
8. Remove the rod bolt.
9. Pull the diaphragm away from the rod.
10. Clean the old silicone adhesive from the top and bottom diaphragm plate and bottom of the rod.
11. Clean the old grease (if any) from the diaphragm sealing groove in the pump body.
To Install the Diaphragm:
1. Apply bead of silicone adhesive around the rod bolt hole on both sides of the diaphragm and let cure until the
silicone skins over.
2. Assemble the diaphragm, upper and lower plates to the rod.
3. Apply silicone grease to the
diaphragm sealing groove in the
pump body.
4. Carefully install the pump top and
diaphragm into the pump body.
Make certain the diaphragm is
properly seated in the groove in
the pump body.
5. Tighten the six (6) 5/16"
mounting bolts in a criss-cross
pattern as shown. (See Fig. 4)
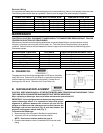
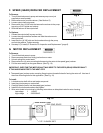
Manual Rotation Method:
1. Remove motor from speed (gear) reducer.
2. Wedge a large flat-bladed screwdriver or pry bar into hollow input
shaft keyway of speed reducer and rotate until rod is at bottom
dead center. (See Fig. 5)
C. ROD BUSHING INSPECTION AND REPLACEMENT
NOTE: The rod and bearing must be replaced as an assembly
because the bearing is pressed into the rod using special
equipment.
To Inspect:
1. Follow steps 1 through 11 in “To Remove the Diaphragm” on
page 3.
2. Remove the hex nuts from the eccentric pin and slide off the old
rod.
3. Inspect the bushing in the rod for wear by measuring the bushing
diameter. If worn beyond the service limits, replace the rod and
bushing.
New: 0.625" [15.88mm]
Service Limit: 0.630” [16mm]
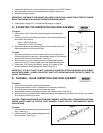
To Install:
1. Lubricate the bushing and eccentric pin with anti-seize compound.
2. Slide rod onto the eccentric pin. (See Fig. 6)
Fig. 6
Fig. 5
Fig. 4
Fig. 3