


2
TABLE OF CONTENTS
WARNING: When using this product, always exercise basic safety precautions including the following:
• Read all instructions before use or installation.
• Never connect this product to any electrical circuit other than the specified voltage, and never exceed the
amperage draw specified in “Electrical Wiring” on page 3.
• Never install, use or service any component of this device in an atmosphere with potentially flammable or
explosive vapors unless specified for explosion-proof atmospheres.
NOTE: EXPLOSION-PROOF COMPONENTS MUST BE WIRED TO NEC CLASS 1, DIV. 2, GROUP D
REQUIREMENTS.
SAFETY INSTRUCTIONS
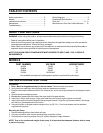
MODELS
1/2
1/2
1/2
1/2
PART NUMBER
VOLTAGE HORSEPOWER
501200
502400
503200
511500
12VDC
24VDC
32VDC
115/230VAC
Also available with optional 3/4 horsepower, explosion-proof and 50 cycle motors.
INSTALLATION INSTRUCTIONS
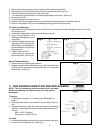
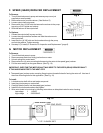
Preparation
1. Note: Motor is shipped separately in its own carton. Remove motor from carton.
2. Verify that motor shaft key, mounting bolts, and lock washers are included.
3. Be sure motor shaft is clean and free of dirt. Remove any “burrs” that may be present in the keyway of motor
shaft.
4. Remove pump from shipping carton.
5. Do not clean grease from the inside of the input shaft of the gear reducer.
6. Insert key in motor shaft keyway. Align motor shaft key with keyway in gear reducer input shaft.
7. Insert motor shaft until motor fits against flange on gear reducer. Align four (4) clearance holes in the flange
with the four (4) threaded holes in the motor.
8. Secure the motor to the gear reducer using the four (4) 3/8"-16 x 1" hex head screws and lock washers
supplied with the pump.
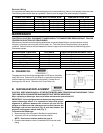
Mounting the Pump
1. Remove shipping platform from bottom of pump.
2. Set pump in position with inlet and outlet pointing in direction of flow.
3. Secure pump to mounting surface using 1/4" (6mm) diameter or larger fasteners.
NOTE: Due to the unbalanced weight of the pump, it is important that adequate fastener size be used
to secure the pump.
Safety Instructions ............................................ 2
Models .............................................................. 2
Installation Instructions...................................... 2
Maintenance ..................................................... 3
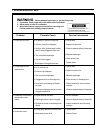
Troubleshooting ................................................. 7
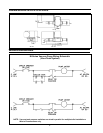
Wiring Diagrams ............................................... 8
Dimensional Specifications ................................ 8
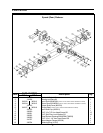
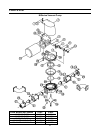
Parts List ................................................... 9 - 11
Manufacturer’s One-Year Limited Warranty: .... 12