


14
UNPLUG THE UNIT BEFORE PERFORMING ANY MAINTENANCE PROCEDURES
Recommended Monthly Maintenance
• Clean the Pre-Filter
• Clean the HEPA Filter
C
LEANING THE PRE-FILTER & THE HEPA FILTER
When visibly dirty or after 30 days:
1. Unplug the power to the unit.
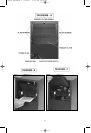
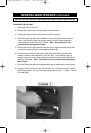
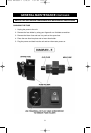
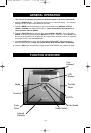
2. Remove the pre-filter by lifting up on the bottom center of the pre-filter panel. (Diagram 1)
3. Remove the HEPA filter by pulling on its ribbon handle. (Diagram 2)
4. With a hand-held vacuum, remove the heavy particulate from both sides of the filters.
5. Re-install the HEPA filter leaving the ribbon handle facing out.
6. Re-install the pre-filter panel. (Diagram 1)
If vacuuming does not clean the filters sufficiently:
1. Rinse both filters in warm water. NOTE: DO NOT use soap, soak in water, scrub with
brush, or squeeze the filters.
2. Shake the excess water off of the filters.
3. Allow both filters to dry thoroughly before re-installing.
NOTE: DO NOT force the filters to
dry using any alternative methods.
4. Re-install the HEPA filter leaving the ribbon handle facing out.
5. Re-install the pre-filter panel. (Diagram 1)
Contact your dealer for replacement filters:
1. Contact the dealer you purchased your product from or visit www.rppurchase.com to
locate your closest dealer.
CHANGING THE UV LAMP
1. Unplug the power to the unit.
2. Remove the pre-filter by lifting up on the bottom center of the pre-filter panel. (Diagram 1)
3. Remove the HEPA filter by pulling on its ribbon handle. (Diagram 2)
4. Carefully roll the UV Bulb until it is loose (bulb fitting is similar to a fluorescent bulb).
(Diagram 3)
5. Remove the UV Bulb. (Diagram 4)
6. Insert new UV Bulb making sure the ends slide into their slots.
7. Carefully roll the UV Bulb until it is not loose. (Diagram 3)
8. Re-install the HEPA filter leaving the ribbon handle facing out.
9. Re-install the pre-filter panel. (Diagram 1)
10. Plug the power back in and then turn on the UV setting to make sure the bulb is
functioning properly. If it doesn’t light up, repeat the above steps again to make sure the
bulb is properly installed into its slots.
Diagram 4
GENERAL MAINTENANCE
Diagram 3Diagram 2Diagram 1
I-4506 BR7580R-1 6/25/07 7:57 AM Page 12