


4
HOW TO USE
ASSEMBLY
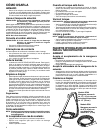
• You will find the drain outlet diverter, a black plastic 45-degree
elbow inside the machine. Place this elbow on the drain valve
on the rear of the unit. The elbow will direct the flow of recovered
water downward.
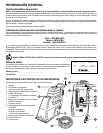
Fill Solution Tank
CAUTION: Use only commercially available carpet and upholstery
cleaners intended for machine applications.
Mix hot water and approved extractor detergent in a clean bucket.
Avoid mixing the chemical and water in the solution tank as the
chemical does not dissolve completely and will clog your solution tank
filter. Clogging the filter will starve the pump of fluid and can shorten
the life of the pump considerably. (Follow recommended mix ratio on
extraction detergent label.)
NOTE: Do not overfill.
Connect Power Cord
CAUTION: To reduce the risk of electric shock, do not lay cord
on any wet surfaces.
• Attach power cord to extension cord provided.
• Plug extension cord into outlet.
Power Switches
The power switch is on the handle.
• Wear ear protection (not provided) if operating the cleaner for a
prolonged period of time.
• Turn all three switches on.
• You will hear and feel the brush rotating in the machine.
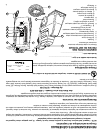
Prime Pump
• The 100-PSI pump MUST be primed. To achieve this, pour
enough water into the solution tank to cover the intake filter
with at least 3 inches of water. With the machine turned on and
the pump switch in the ON position, press the GREEN button
between the handles until the air in the line is emptied and the
jets are spraying evenly. After priming the pump, fill the solution
tank with your water/solution mix.
Begin Cleaning
• This unit cleans only while pulling backwards. To push, slightly tip
the front of the unit off the surface of the carpet and roll forward.
The brush roll should contact the carpet only on the backward
stroke. To clean an area press the GREEN spray button and pull
the machine backwards. Keep unit moving at a slow, steady pace.
You can go over the area again without pressing the GREEN
spray button to vacuum up additional solution from the carpet.
• You will notice the carpet you just cleaned will be damp. This is
normal.
Tips:
For best results vacuum area to be cleaned before using the carpet
cleaner. If used to clean up spills or messes, clean up as much of
the spill or mess using paper towels before final cleaning with the
cleaner. If used on fine fabrics or upholstery, test for color fastness
in an inconspicuous place before cleaning. Do not leave unit running
in one spot. Carpet damage could result.
Automatic Shut-Off
NOTE: Always use the wet vacuum cleaner in the upright
position. If cleaner tips over, the suction automatically
shuts off.
If the cleaner tips over:
• Turn off the power switch and set the cleaner upright.
• Wait a few seconds for the motor to come to a complete stop.
• Restart the motor.
When the tank is full:
• As the tank fills with liquid, the ball float (inside the cage) rises
until it seats itself against the bottom of the motor.
• The motor sound becomes a high pitch sound.
• The shut-off stops the suction.
• Turn off the power switch.
• Empty the tank (instructions follow).
Empty Tank
CAUTION: Turn off the power switch and unplug electrical cord
to service.
• Empty contents into a suitable drain by pulling the T-handle on
the waste valve. (See page 3.)
• Use special care when emptying full tanks with liquids. Complete
opening of the waste valve can result in a sudden rush of
liquid.
• Close T-handle on the waste valve to continue cleaning.
Clean and Store
NOTE: Turn off the power switch and unplug electrical cord
before cleaning tank.
• Empty tank of all liquid and thoroughly rinse inside before
storing.
• Clean and dry tank and all accessories.
• Store indoors in a cool, dry area.
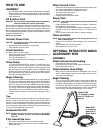
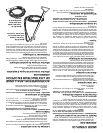
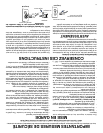
OPTIONAL EXTRACTOR WAND
ACCESSORY KITS
ASSEMBLY
Attach Vacuum Hose Coupling
• Disconnect hose from hose inlet.
• Push the accessory hose coupling into the hose inlet.
• Give a slight twist to secure.
Attach Solution Hose Fitting
• Make sure the quick disconnects snap together firmly. As you
do this, always inspect hoses for cracks, fraying or leaks. Do not
use if hoses are damaged.
Begin Cleaning
• Turn on the vacuum switch and the pump switch. With the
cleaning nozzle and hose in hand you may begin cleaning. By
pulling the solution trigger, you will disperse the solution onto the
desired area. Because the vacuum is on, the fluid will quickly
be sucked back into the cleaning nozzle. You will notice that the
area you have just cleaned will be damp. This is normal.
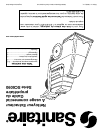
Model SC80
15' Accessory Hose
with 12" Single Jet
Nozzle
Model SC81
8' Accessory
Hose with 3"
Metal Nozzle