


Controlling a Group
∗ You should adjust the option switches in the electrical component box or on the PCB of the wired remote
controller.
∗ Before setting up the option switches, always make sure that you have turned off the main power.
∗ After adjusting the options, you should supply the power. Otherwise, the options will not be applied.
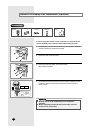
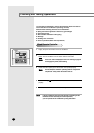
A user can operate up to sixteen air conditioners by using the wired remote controller.
In this case, the air conditioner can be controlled by only one wired remote controller
connected to the indoor unit and cannot be controlled by the others.
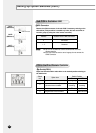
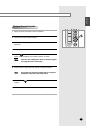
Connect the R1, R2 and R3 terminals in the wired remote controller to
each R1, R2 and R3 terminals in any indoor unit “A”.
1
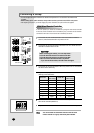
Connect the R1 and R3 terminals in the indoor unit “A” to the R1 and R3
terminals in another indoor unit “B”.
2
Connect the R1 and R3 terminals of “B” to any indoor unit “C” and connect
the others as the same way.
3
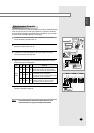
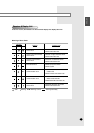
Adjust the rotary digital switch in the main PCB to the desired position
referring to the table below.
4
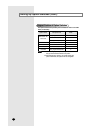
Remove the CN20 connectors on the sub PCBs except the unit connected
with remote controller(Address 0).
5
Adjust the DIP switch No. 2 in the wired remote controller to “ON” position.
6
With Wired Remote Controller
You cannot install the centralized controller when the wired
remote controller for a group has already been installed.
NN
NN
oo
oo
tt
tt
ee
ee
Unit A
Unit B
Unit C
CN20 Connector
CC
CC
AA
AA
UU
UU
TT
TT
II
II
OO
OO
NN
NN
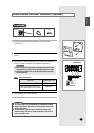
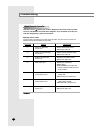
When connecting the cables, you must keep these :
◆
The R1 terminals must be connected to the R1s.
◆
The R3 terminals must be connected to the R3s.
◆
Do not connect the R2 terminals to anywhere.
If you connect R2 terminals, the PCB will be damaged.
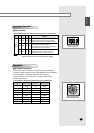
0
1
2
3
4
5
6
7
One
Two
Three
Four
Five
Six
Seven
Eight
8
9
A
B
C
D
E
F
Nine
Te n
Eleven
Twelve
Thirteen
Fourteen
Fifteen
Sixteen
Switch No.
Number of
indoor unit(s)
Switch No.
Number of
indoor unit(s)
E-
62