


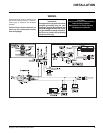

8 Regency F38-2 Freestanding Gas Stove
INSTALLATION
CONVERSION KIT# 731-968 FROM NG TO LPG
THIS CONVERSION MUST BE DONE BY A QUALIFIED GAS FITTER IF IN DOUBT DO NOT DO THIS CONVERSION !!
1) Shut off the gas supply.
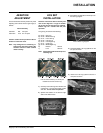
2) Open the front door and carefully remove
the logs and lava rock.
Pilot assembly is now accessible
for steps 4) to 9).
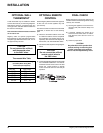
LPG Conversion Kit Contains:
Qty. Part # Description
1 910-037 LPG Injector
(Pilot Orifi ce)
1 904-390 Burner Orifi ce #52
1 908-528 Red "LPG" label
1 908-255 Label "Converted to
LPG"
1 904-529 5/32" Allen Key
Note: Use a magnetic type screwdriver
if possible.
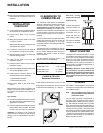
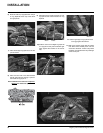
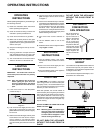
7) Turn control knob to
the “OFF” position.
8) Remove the black
protection cap by
hand from the high-
low knob (Fig.1).
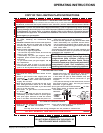
9) Insert a 5/32” or
4mm Allen wrench
into the hexagonal
key-way of the
screw (Fig. 2), rotate
it counter-clockwise
until it is free and
extract it.
10) Check that the screw is clean and if
necessary remove dirt.
11) Flip the screw (Fig. 3).
12) Using the Allen
wrench as shown
in Fig.4, rotate the
screw clockwise
until snug, do not
overtighten.
Fig.4
4) Open pedestal door and remove the gold
chain from door which will allow door to
fall.
5) Remove lighting panel by removing the 6
Phillips head screws and put to the side.
6) Remove hi-low extension knob.
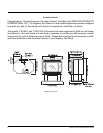
3) Remove burner. See diagram below.
Fig. 1
Fig.2
Fig.3
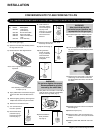
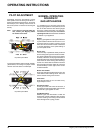
15) Pull off the pilot cap to expose the pilot
orifi ce.
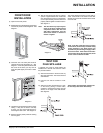
14) Re-assemble the
black protection
cap (Fig. 6).
WARNING!
Also check that the pilot
and main burner injectors are
appropriate for the gas type.
Fig. 6
WARNING!
Do not over tighten the screw.
Recommended to grip the
wrench by the short side.
13) Verify that if the conversion is from NG to
LPG, the screw must be re-assembled
with the red o-ring visible (Fig. 5).
LPG Configuration
Red o-ring visible
Fig.5
16) Unscrew the pilot orifi ce with the allen
key and replace with the LPG pilot orifi ce
in the kit.
18) Reinstall new burner orifi ce LPG stamped
#52 and tighten.
19) Reverse steps 3) to 2).
20) Attach the label "This unit has been con-
verted to LPG" near or on top of the Serial
# decal.
21) Replace yellow "NG" label with red "LPG"
label.
Burner Orifi ce
17) Remove burner orifi ce with a 1/2" wrench
while using a 9/16" wrench to hold onto
the elbow behind the orifi ce, then discard
the orifi ce.