


14 FG37 Regency Rear Flued Room Sealed Freestanding Gas Heater
Installer Notice:
These instructions must be left with
the appliance.
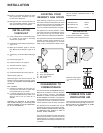
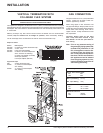
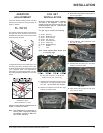
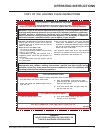
Minimum pressure: Remove one of the
cables connected to the electric modulator.
Keeping the nut (B) blocked, screw in the
screw (C) to increase the pressure and
screw it out to decrease it. Use a screw-
driver 6 x 1 blade.
NOTE: The outlet pressure must be set to
minimum 0.74 kPa.
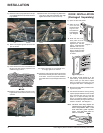
After carrying out all adjustments, block
the setting screws with paint, taking care
not to obstruct the breather orifice of the
pressure.
Put back the modulator plastic cap.
WARNING: To ensure the correct opera-
tion of the modulator it is necessary that the
plastic cap (A) is returned to its original
location.
23)At the end of all setting and adjustment
operations, check electrical insulation and
gas leaks.
24)Reverse step 20.
25)Check operation of fan and flame control.
26)Check for proper flame appearance and
glow on logs.
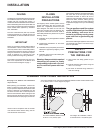
Cable
Electric
Modulator
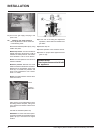
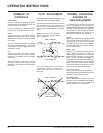
22) Adjusting the Outlet Pressure
All the adjustments must be carried out
in the following order:
Remove the modulator plastic cap (A) using
needle nose pliers.
Maximum pressure: Turn the unit ON to its
highest input rating. Screw in the nut (B) to
increase the outlet pressure and screw it
out to decrease it. Use a 10 mm wrench.
NOTE: The outlet pressure must be set to
maximum 2.65 kPa.
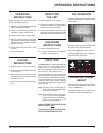
21)Turn on the gas supply and plug in the
power cord.
C
B
A
INSTALLATION