


8
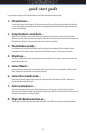
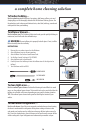
quick-start guide
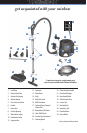
In just a few quick steps, you’ll have your Rainbow assembled and ready to begin cleaning.
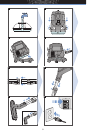
1. Fill water basin…
Start with cool water from the faucet. Fill the water basin until the top of the dome in the bottom of the basin
is covered. Overlling or under lling will reduce cleaning performance. Water should be replaced when water
action is visibly reduced.
2. Clamp Rainbow to water basin…
Align and set the Rainbow on top of the water basin. Hook the two water basin latches on each side of the
Rainbow to the rim of the water basin and snap up. To disconnect from water basin, release the two clamps and
lift Rainbow. The Rainbow will not operate without the water basin attached.
3. Place Rainbow on dolly…
Place Rainbow with water basin attached on dolly, matching the protruding end of the Rainbow with the
protruding end of the dolly as shown. A foot latch locks Rainbow into place. To release, press foot latch.
4. Attach hose…
Press hose coupling into air inlet opening of power unit until hose clicks. To remove, squeeze both latches and
pull hose from power unit.
5. Connect Wands…
Insert the male end of one wand into the female end of second wand. Press wands together until button lock
clicks. To disconnect, press button on wands and pull apart.
6. Connect hose-handle wand…
Insert the hose-handle wand into the female end of top wand. Push until button lock clicks. To disconnect,
press button on wand and pull apart.
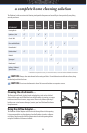
7. Select an attachment…
Determine what type of cleaning you will be performing (see chart on page 11), then insert the desired
attachment into the bottom wand or pistol grip hose handle wand. Button will lock into hole on either wand. To
disconnect, press button on wand and pull o.
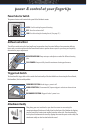
8. Plug in the Rainbow and turn on…
Plug the power cord into your most convenient wall outlet. Select HIGH for maximum cleaning performance.