


8
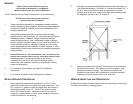
6. Caution: The mounting flange is provided with pre-punched
holes, never leave holes or slots unsealed; water can penetrate.
Caution: Fasteners should be installed so spacing is not more
than 10" on center (see figure 4), but may be installed closer
together if so desired. Continue installation of the rest of the
fasteners starting in the center of each member and progressing
out to the corners. Fasteners must be installed close enough
together to ensure the sealant on the back of mounting flange
makes full contact with the exterior perimeter of the R.O.
7. Note: One (1) fastener must be installed at each corner so that
it is within ¾” to 1¼” of the end of the frame member extrusion
joined to form the corner (see figure 4).
OPTIONAL INSTALLATION PROCEDURES
Insulation – Insulate between the window frame and the interior of the R.O.
at both jambs and at the head. Caution: Do not over pack insulation, as
bowed frame/jambs may result. Expandable foam type material may bow
frame also, causing improper operation of the unit.
Cleaning – Do not use abrasive cleaners on the glass as they may perma-
nently scratch or mar the surface. Any cleaners, other than a mild deter-
gent and soft cloth, should be tried in a small corner of the window so as to
check whether they damage the finish.
Weather-stripping, hardware components, tracks or vinyl components
should not be painted or stained.
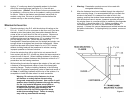
Flashing – Philips recommends the use of flashing for proper drainage.
Reference Section 16 (New Construction Installations) of AAMA Installer
Certification Manual. It is also acceptable to use a “house wrap system”
that is sealed and allows no opportunity for water to penetrate behind the
mounting flange to the interior wall cavity.
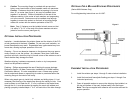
When using staple guns to install vinyl windows and sliding doors, it it not
necessary that one leg of the staple pass through the nailing fin hole. Care
must be taken to not break the fin. If a fin is cracked or the staple blows
through the fin, it must be repaired by sealing the crack with sealant and
placing a properly installed staple 1” or 2” on each side of the blow through.
O
PTIONAL
F
IELD
M
ULLING
/S
TACKING
P
ROCEDURES
(Series 800 Windows Only)
For mulling/stacking instructions use Lit-1607.
9
Figure 5
C
ASEMENT
I
NSTALLATION
P
ROCEDURES
1. Install the window per steps 1 through 5 under window installation.
2. Install the head and frame/jamb flashing per steps 1 through 5 as
instructed previously.
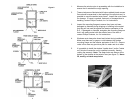
3. Open all operable sashes to remove the shipping clips installed, on
the top and bottom of the sash, farthest away from the hinges.
Note: The clips are applied with adhesive and must be removed for
proper operation.