


Re-install Interior Frame Covers.
Note: Discard all Quick Release Bands before re-installing Interior Frame Covers.
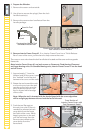
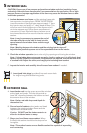
K. Interior Frame Cover #3+HDGFRYHURQ&DVHPHQW)L[HGDQG
Large Awning and the jamb cover without roto cover cut-out on
6WDQGDUG$ZQLQJXQLWV
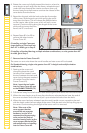
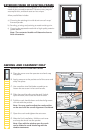
Starting on one end of the frame,
insert the cover barbs of Interior
)UDPH&RYHULQWRWKHIUDPHNHUIV
Align the kerfs along the length of
the cover and press until the cover
FOLFNVLQWRSODFH
Note: Interior Frame Cover #3
contains compression springs which
allow the cover to be compressed
when re-installing Interior Frame
Cover #1 in Step 4M.
4K NOTE
Compression Spring
$PNQSFTTJPO4QSJOH
MPDBUJPOJO
$PWFS
$07&3
$07&3
$07&3
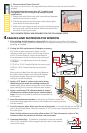
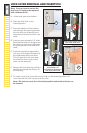
L. Interior Frame Cover #26LOOFRYHURQ&DVHPHQW)L[HGDQG/DUJH$ZQLQJDQG
DMDPEFRYHUZLWKURWRFRYHUFXWRXWRQ6WDQGDUG$ZQLQJXQLWV
Place the cover support referenced in Step C4 inside the cover as shown. While
holding the support in place,
position the cover to align the
cover barbs with the frame
kerfs. Press the cover barbs
into the kerfs while working
toward the roto operator.
Continue to hold the support
in place to ensure proper
placement of the support over
the operator. Press the cover
XQWLOLWFOLFNVLQWRSODFH
Note: The cover support
bracket may need to be repositioned over the roto operator. The correct support
position allows the cover barbs to be fully seated into the frame kerfs.
4L
Cover Support Bracket
4L
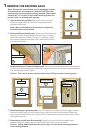
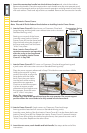
J. Insert the construction handle into the lock lever location and unlock the window.
5HPRYHWKHKDQGOH3ODFHWKHFRQVWUXFWLRQFUDQNKDQGOHRYHUWKHURWRRSHUDWRUVWXG
Open and close each sash to verify the smooth operation and alignment of sash locks
ZLWKVDVKVWULNHV&KHFNDQGDGMXVWVKLPVDVQHHGHG5HPRYHWKHFRQVWUXFWLRQKDQGOH
"8/*/(
$"4&.&/5
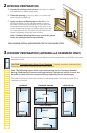
0Interior Frame Cover #1-DPEFRYHUVRQ&DVHPHQW)L[HGDQG/DUJH
$ZQLQJDQGWKHKHDGDQGVLOOFRYHUVRQ6WDQGDUG$ZQLQJXQLWV
,QVHUWWKHFRYHUEDUEVRIWKHŵUVW,QWHULRU)UDPH&RYHULQWRWKHIUDPHNHUIVQHDU
,QWHULRU)UDPH&RYHUŵUVW5RWDWHWKH,QWHULRU)UDPH&RYHUWRZDUGV,QWHULRU
)UDPH&RYHUDQGDOLJQWKHNHUIVDORQJWKHIUDPHWKHQSUHVVWKHFRYHUXQWLOLW
FOLFNVLQWRSODFH5HSHDWRQWKHRWKHUFRYHU
N. Insert the roto cover, crank handle and lock handle. See steps at the end of the
instructions.