


4 INSTALLATION CLIP METHOD
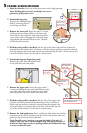
A. Fasten the window to the openingBYDRIVINGTWOXCORROSION
resistant screws into the pre-punched holes in the clips. If clips are bent
and fastened to the interior stud/block, install the screws as close to the
bend as possible.
Note: DO NOT shim above the window. For masonry openings use
two 3/16" x 1-1/2" masonry screws per clip. Pre-drill the masonry
before attempting to drive the screws in.
B. Plumb and square window.
Frame screw method: Place shims 1" from the bottom
and top of the window between the window and the
sides of the opening. Adjust the shims as required to
plumb and square the window in the opening. Place
shims at the midpoint of the window sides. Adjust
the shims until the window sides are straight, and
the space between the sash and frame is equal from
top to bottom.
Installation clip method: Shim between the installation
clip and the rough opening at each clip location.
Note: DO NOT shim above the window or in the space between the spacers at the bottom
of the window. DO NOT over shim.
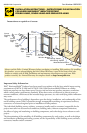
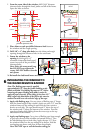
C. Check the interior reveal. Make sure the measurement from the interior
face of the window to the interior face of the wall is equal at several points
around the window.
Note: If the dimensions are not equal, check to make sure the fins are
folded out to 90° at all points.
EXTERIOR
3D
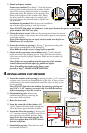
D. Fasten the window to openingBYDRIVINGGALVANIZEDROOlNGNAILS
into each pre-punched hole in the nailing fin.
Note: Make sure the fin corner is lying as flat as possible.
E. Check window operation (vent windows only). Cut the checkrail
bands and remove the shipping spacers. Open and close the window
a few times to check for proper operation. Make sure the window will
tilt correctly.
Note: If there are any problems with the operation of the window,
recheck shim locations and adjust for plumb and square.
INTERIOR
4A
4B
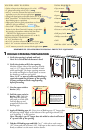
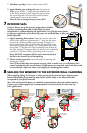
Note: If installing the window using frame screws,
proceed to Step 5 - FRAME SCREW METHOD.
B. Simulated-hung only: Remove the
simulated-hung lock by removing the
four screws from each lock.
C. Raise the lower sash.
INTERIOR
6“ 6“
CENTER
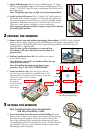
Note: Arrows indicate the
placement of clearance holes.
4C
SILL
#10 x 3"
stainless steel
flat head
wood screw
4E
4D
Drill 13/64”
diameter clearance
hole.
D. From the room side of the window, drill
DIAMETERCLEARANCEHOLESTHROUGHTHE
sill of the frame. Space the holes as shown.
E. Fasten the sill to the openingBYDRIVING
XCORROSIONRESISTANTmATHEADWOODSCREWS
into each of the pre-drilled clearance holes.
Note: Drive the screws until snug but DO
NOT over-tighten them. DO NOT bend or
bow the unit frame.
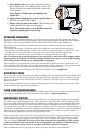
1
20
30 40 50 60 70
23
INCHES
m
m
3C
INTERIOR
3B
3B
F. Simulated-hung only: Close the lower sash
and reinstall the lock(s).