


2 PREPARE THE WINDOW
A. Remove plastic wrap and cardboard packaging from window. DO NOT cut the checkrail
bands or remove plastic shipping spacers located between the window sash and frame. The
shipping spacers will help keep the window square during installation. DO NOT open the
window until it is fully fastened.
Note: If screens, grilles or hardware are removed from
the window at this time, label them and store them in a
protected area.
3 SETTING THE WINDOW
TWO OR MORE PEOPLE WILL BE REQUIRED
FOR THE FOLLOWING STEPS.
1H
1"
1G
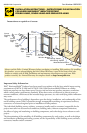
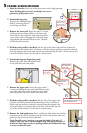
'Apply sill flashing tape #2. Cut a piece of flashing tape 12" longer
THANTHEOPENINGWIDTH!PPLYATTHEBOTTOMOVERLAPPINGTAPEBY
at least 1". DO NOT allow the tape to extend past the interior face of
THEFRAMING'
Note: The flashing tape may not fully cover the framing members.
H. Install and level sill spacers.0LACEWIDEBYTHICKSPACERSON
the bottom of the window opening 1/2" from each side. Spacers are
also required at points where windows are joined in multiple window
applications. Add shims as necessary to ensure the spacers are level.
Once level, attach spacers and shims to prevent movement.
Note: Improper placement of shims or spacers may result in bowing
the bottom of the window.
2B
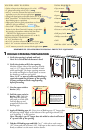
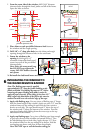
B. Fold out installation fin to 90°. Be careful not to remove
or tear the fin corners.
Note: If the fin is not at 90°, the window will not line up
correctly on the interior.
Note: If installing the window using frame screws,
proceed to Step 3 - SETTING THE WINDOW.
C. Install installation clips. Place the clip so that the
lip is facing up and against the installation fin, at the
locations shown in the placement diagram. Secure the
CLIPBYDRIVINGXCORROSION
resistant screws
through the
outer two holes
of the three
holes shown.
6“ from end
Lip
2C
#6 x 5/8” screws
6“
6“
3“
3“
CENTER
6“CENTER
6“
6“ 6“
3“
3“
CENTER
CENTER CENTER
Top of lower sash
2C
PLACEMENT DIAGRAM
Note: Arrows indicate the
placement of installation clips.
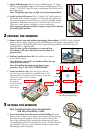
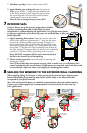
A. Insert the window from the exterior of the building. Place the
bottom of the window on the spacers at the bottom of the opening,
then tilt the top into position. Center the window between the
sides of the opening to allow clearance for shimming, and insert
one roofing nail in the first hole from the corner on each end of the
top nailing fin. These are used to hold the window in place while
shimming it plumb and square.
EXTERIOR
3A