


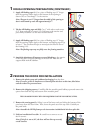

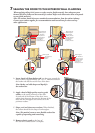

2 PREPARE THE DOOR FOR INSTALLATION
A. Remove the plastic wrap and cardboard packaging from the door.
Note: If screens, grilles or hardware are removed from the door at this time, label them
and store them in a protected area.
1 ROUGH OPENING PREPARATION (CONTINUED)
2D
1H
1"
1G
1F
1"
1/2"
1/2"
6"
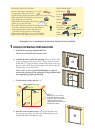
1E
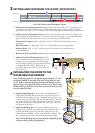
E. Apply sill ashing tape #1. Cut a piece of ashing tape 12" longer
than the opening width. Apply at the bottom of the opening as
shown (1E) so it overhangs 1" to the exterior.
Note: e tape is cut 12" longer than the width of the opening so
that it will extend up each side approximately 6".
F. Tab the sill ashing tape and fold. Cut 1" wide tabs at each corner
(1/2" from each side of corner) (1F). Fold tape to the exterior and
press rmly to adhere it to the water resistive barrier.
G. Apply sill ashing tape #2. Cut a piece of ashing tape 12" longer
than the opening width. Apply at the bottom, overlapping tape #1 by
at least 1". Do not allow the tape to extend past the interior face of
the framing (1G).
Note: e ashing tape may not fully cover the framing members.
H. Attach the aluminum sill support or wood blocking to the exterior
of the box plate to support the edge of the door sill. Place the sill
support ush with the suboor.
B. Remove the shipping spacers. Carefully slide the movable panel halfway open and remove the
spacers from both the top and bottom of the movable panel.
TWO OR MORE PEOPLE WILL BE REQUIRED FOR THE FOLLOWING STEPS.
C. Remove the venting panel by lifting it out of the lower track and tilting the bottom of the
panel away from the door frame. en, lower the panel out of the top track. Carefully set
the panel aside.
Note: Assemble the OXXO frame per the instructions included with the door splice kit.
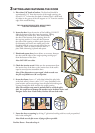
D. Fold out installation n to 90
º
. Be careful not to remove or tear
the n corners.
Note: If the n is not at 90°, the door will not line up correctly
on the interior.